.png)
PayFields - Additional Features - Canada
Definitions and examples of using PayFields' optional features.
This page provides details about the following features of PayFields:
Feature | Use Case |
|---|---|
Level II Fields | Include additional data with transactions to qualify for better interchange rates. |
Billing Address | Add billing address fields and prefill them if applicable. |
Customization | Set the styles and contents for the payment fields. |
Card Swipe Popup | Add a popup to support collecting payment data using a compatible card reader. |
Transaction Submit Button | Add a preconfigured submission button that makes it easy to build a payment page. |
Zero Dollar Auth | Check the validity of a payment method or obtain authorization for a transaction without actually charging the customer's account. |
Tokenization | Create card tokens for automatic and recurring payments. |
ACH | Accept payments using a customer’s bank account information. |
For definitions of the PayFields actions, including the transaction result callback functions, see the Developer Guide.
Important Info for Canadian Merchants:
provincefields replace thestatefields (see valid values here).postalfields replacezipfields (see valid values here).currencywill be in CAD.
Level II Fields
PayFields provides Level II fields for merchants who use additional information to qualify for reduced interchange fees. The example below shows how to add the Level II/III fields and set their values:
PayFields.config.order = {order number};
PayFields.config.tax = {tax number};
PayFields.config.dicount = {discount number};
PayFields.config.shipping = {shipping number};
PayFields.config.duty = {duty number}
PayFields.config.items = {items Object}
PayFields.config.billingAddress = {
  address: '123 Madison Street',
  city: 'New York',
  state: 'NY',
  zip: '12345',
  email: '',
  phone: '',
  address2: 'suite 555',
  company: 'Essential Co',
  country: 'USA'
};
PayFields.config.additionalData = {Additional Object};
PayFields.config.invoiceResult = {Invoice Object}
Billing Address
Billing Address information can be entered by the customer or submitted by the merchant, if the merchant already knows the values. The sections below describe how to use PayFields in each of the following cases: customer entry, prefill and display, prefill and do not display.
Customer Entry
To add billing address fields to a payment page so that a customer can fill in the information use the PayFields.fields = []; function to define the elements that will display the billing address fields.
For customer entry of the billing address, do not set values for the individual address fields. If you set values for the fields in the "address" object, the customer will NOT be able to modify the values.
The code below shows how to include the "address" type in the PayFields.fields function:
PayFields.fields = [
  {type: "number", element: "#number"},
  {type: "cvv", element: "#cvv"},
  {type: "name", element: "#name"},
  {type: "expiration", element: "#expiration"},
  {type: "address", element: "#address"}
]
Prefill and Display
To prefill the billing address and display the values use the PayFields.fields function to define the elements that will display the billing address fields and the values that they will contain.
The code below shows how to prefill and display the billing address fields:
PayFields.fields = [
  {type: "number", element: "#number"},
  {type: "cvv", element: "#cvv"},
  {type: "name", element: "#name"},
  {type: "expiration", element: "#expiration"},
  {
    type: "address",
    element: "#address",
    values: {
      address: "123 Madison Street",
      city: 'New York',
      state: 'NY',
      zip: '12345',
      email: 'test@test.com',
      phone: '2223456789'
    }
  }
]
Prefill and Do Not Display
Use the PayFields.config.billingAddress function to set values for all of the billing address elements. These values will be sent directly to Payrix when the transaction is submitted, and they will not be displayed to the customer.
The code below shows how to set previously know billing address values using the PayFields.config.billingAddress function:
 // Fields address, city, state, zip, email, and phone will only be set
 // if there are no address fields setup

PayFields.config.billingAddress = {
 address: '123 Madison Street',
 city: 'New York',
 state: 'NY',
 zip: '12345',
 email: 'test@test.com',
 phone: '2223456789',
 address2: 'suite 555',
 company: 'Essential Co',
 country: 'USA'
 };

// Fields address2, country, and company will always be set regardless
// if address fields are setup since they are considered extra billing
// address fields.
If you use both the PayFields.fields and PayFields.config.billingAddress options, the expiration, email, and phone fields are required by default. To make them optional, add the following code to the PayFields <script> block:
PayFields.customizations.optionalFields = ["#email", "#phone", "#expiration"];
Customization
PayFields provides the following features that can be used to customize your user experience:
Placeholder Text - Add placeholder text to the form fields to provide examples or explanations of the required data.
CSS - Use CSS to define the look and feel of the payment fields.
Placeholder Text
To change the placeholder for any of the fields, create a PayFields.customizations.style = {}; object and set the key to the field and the value to the desired placeholder text. The example below shows how to set the placeholder text:
PayFields.customizations.placeholders = {
    '#name': 'Card Holder',
    '#expiration': 'Expiration (MM/YY)',
    '#payment_cvv': 'CVV',
    "#payment_number": '0000 0000 0000 0000'
}
Use the following keys to the set placeholder text for the associated field: '#payment_number', '#expiration', '#payment_cvv', '#name', '#address1', '#city', '#state', '#zip', '#email', and '#phone'.
CSS
Payrix passes a style object with the class(es) or ids to be styled. Specific classes such as .number have priority over more generic classes such as .input. In other words, classes will stack on each other.
In the case of the same property on both classes being styled, the class with the highest priority will overwrite the other. All CSS keys should be converted to camelCase as shown below:
PayFields.customizations.style = { ".input": { borderStyle: "solid" } }
The code below shows an example of setting styles for the .input class:
The table below defines the classes and IDs available for styling PayFields elements:
Code Snippet | Field Description | Type |
|---|---|---|
| All Fields | Class |
| Number Field | Class |
| Expiration Field | Class |
| CVV Code Field | Class |
| Cardholder Name Field | Class |
| All Cardholder Address Fields | Class |
| Address 1 | Class |
| City | Class |
| State | Class |
| Zip | Class |
| Class | |
| Phone | Class |
| All Error Spans | Class |
| Card Number Error Span | Class |
| Card Expiration Error Span | Class |
| Card CVV Error Span | Class |
| Cardholder Name Error Span | Class |
| All Address Error Span | Class |
| Address 1 Error Span | Class |
| City Error Span | Class |
| State Error Span | Class |
| Zip Code Error Span | Class |
| Cardholder Email Error Span | Class |
| Phone Number Error Span | Class |
| Credit Card Icon | Class |
| Swiper iFrame | ID |
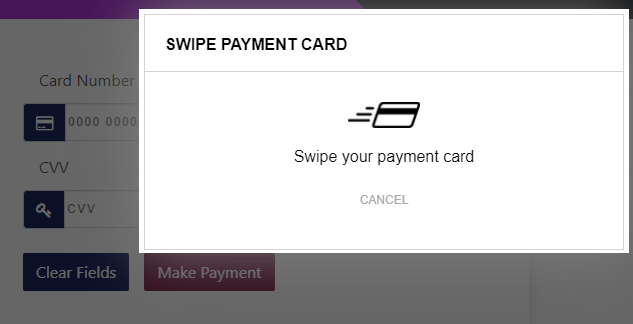
Card Swipe Popup
The card swipe popup opens a separate modal that supports collecting payment information from an unencrypted card reader. The image below shows the card swipe popup:
PayFields supports two ways to launch the card swipe popup: the PayFields.swipePopup(); function and the card swipe popup button. The sections below provide examples of each:
Card Swipe Popup Function
Add the code below in a <script> tag to enable the card swipe popup:
Payfields.config.swipe = true;Call the PayFields.swipePopup(); function to display the popup:
PayFields.swipePopup();A standard implementation calls the swipePopup() function using an event listener attached to a button, as shown in the code below:
PayFields.config.swipe = true;
swipeBtn.addEventListener('click', function() {
  PayFields.swipePopup();
})

let swipeBtn = document.querySelector('#swipeBtn');
Card Swipe Button
The card swipe button opens the card swipe modal when clicked. The code below shows how to add the card swipe button:
PayFields.swipeButton = { element: "#swipe", value: "Click to Swipe"};Assign the value set in the element field to a <div> on the payment page. Payfields will display a button in the <div> with the text assigned with the value field as the label.
Submit Transaction Button
The example below shows how to add a preconfigured button to submit transaction information to Payrix for processing:
PayFields.button = { element: "#submit", value: "Click to Submit" };The text set for the value element will appear as the label on the button.
Creating a custom HTML button with an attached event listener that calls the PayFields.submit(); function provides additional customization capabilities.
Zero Dollar Auth
Use zero dollar auth transactions to obtain approval for a payment method without actually charging the cardholder’s account. Zero dollar auth transactions are a component of setting up automatic and recurring payments. Follow the steps below to perform zero dollar auth transaction:
Set the PayFields transaction mode to
'txn'as shown below:CODEPayFields.config.mode = 'txn';Set the transaction amount to
`0`as shown below. Use a string for the amount:CODEPayFields.config.amount = '0';Set the transaction type to
'auth':CODEPayFields.config.txnType = 'auth';
Tokenization
The PayFields tokenization feature makes it possible to store a reference to payment information that can be used to process automatic or recurring payments. PayFields supports token only and transaction+token functions.
Do not use the tokenization feature in combination with Customer, since Customer is a unique token/card holder. Creating a tokenized card creates a unique Customer.
The sections below provide examples of how to generate tokens using PayFields.
Token Only
To tokenize a card payment, set the Payfields.config.mode value to 'token', as shown below, to submit a token-only request (specific to card payments only, see eCheck instructions below.)
PayFields.config.mode = 'token'; To tokenize an eCheck payment, set the Payfields.config.mode value to 'txnToken' must be used:
PayFields.config.mode = 'txnToken'Token with Transaction
Set a transaction amount and set the PayFields.config.mode value to 'txnToken', as shown below, to submit a payment transaction and generate a token at the same time:
PayFields.config.amount = '0';
PayFields.config.mode = 'txnToken';
ACH
The information below provides an overview of the PayFields ACH feature. See the Accept ACH Payments With PayFields page for details about building a payment page that accepts ACH payments.
Set the PayFields.config.txnType to ecsale. Failure to update this value will result in an error during the eCheck transaction request.
PayFields.config.txnType = 'ecsale';Add routing number, account number, and account type fields on the payment page as shown in the code below:
PayFields.fields = [
    {
        type: "routing",
        element: "#routing",
    },
    {
        type: "account_type",
        element: "#account_type",
    },
    {
        type: "account_number",
        element: "#account_number",
    },
    {
        type: 'name',
        element: '#name',
        values: { name: 'John Wayne' }
    },
    {
        type: 'address',
        element: '#address',
        values: {
            email: 'one@two.com',
            city: 'New York'
        }
    }
];