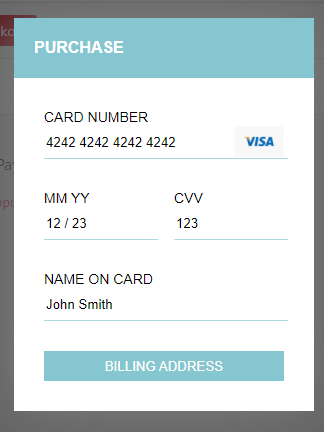
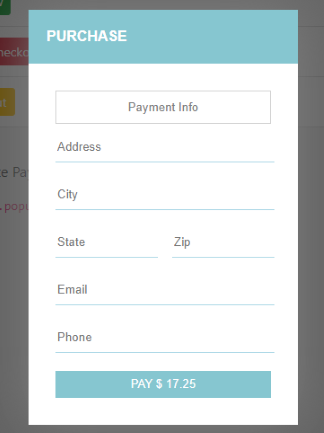
PayFrame embeds a Payrix Pro platform-hosted payment form on a Merchant’s checkout page with basic customizations and minimal development effort. PayFrame integrates a secure payment form, enhancing customer experience and ensuring PCI-compliant transaction processing. With customizable JavaScript and callback functions, PayFrame allows easy adjustments to the form's appearance and functionality. The following images are examples of an integrated PayFrame payment form:
You can use this guide to integrate PayFrame to create and customize the integrated payment page for your Merchants. This guide covers configuration, display functions, customization options, transaction submission, and response handling for a seamless payment experience.
Configure the PayFrame Integration
All configuration parameters are accessed using PayFrame.config. The following table lists the required setup configuration parameters:
Parameter | Type | Description | Notes and Valid Values |
|---|---|---|---|
| string | A limited-use token for securely authorizing Merchant PayFrame transactions. | Use for secure, limited-use access. Do not use with the For more information about Transaction Session Keys, see Integrated Payment Pages: Best Practices. |
| string | The credential used to authenticate and authorize Merchant PayFrame usage. | Do not use with For steps on setting up rolling API key workflows, see Integrated Payment Pages: Best Practices. |
| string | The Payrix Pro ID of the Merchant processing the transactions. | N/A |
| integer | The transaction amount in cents. | Example:
|
| string | The type of transaction being processed. | Valid Values:
|
| string | Defines how PayFrame handles card tokenization and sale transactions, with or without saving the payment method. | Valid Values:
|
Initialize the PayFrame Payment Form
Follow these steps to initialize the PayFrame library:
Add jQuery and PayFrame Libraries: Include the latest jQuery version and the Payrix Pro PayFrame script at the top of the page to ensure necessary libraries are available for integration.
<!-- Include latest stable release of jQuery -->
<script type="text/javascript" src="https://code.jquery.com/jquery-2.2.4.min.js"></script>
<!-- Include the Sandbox PayFrame Script -->
<script type="text/javascript" src="https://test-api.payrix.com/payFrameScript"></script>
Initialize PayFrame: Set the required configuration values in a
<script>block on the page to initialize the PayFrame library.PayFrame.config.apiKey = "ab123c4def5g6hijkl7890m12345no6p"; // Required PayFrame.config.merchant = "t1_mer_123ab4c567defg8h90123i45"; // Required PayFrame.config.amount = 500; // Required PayFrame.config.txnType = 'sale'; // Required. PayFrame.config.mode = 'txnToken'; // Required.(Optional) Configure the Billing Address: Prefill the customer's billing address by setting values for the
billingAddressobject in the PayFrame<script>block. This optional data object enhances convenience by using stored information for future transactions and capturing new customer billing address data for interchange.PayFrame.config.billingAddress = { address: "123 Main Street", city: "New York", state: "NY", zip: "10001", email: "[email protected]", phone: "555-555-5555" };
Result: The PayFrame library is configured on your Merchant’s checkout page. You can now process sandbox or production environment transactions. Further display options, customizations, and response handling can be applied as needed.
Set Your Payment Form Display Options
After initializing the PayFrame library with the required frameworks, configuration options, and optional billing address, you can control how and when the payment form is displayed using one of the following methods:
Display Payment Form Button
Display the payment form when the customer clicks a button, allowing users to control checkout timing. Configure the button in the PayFrame <script> to open the payment form upon clicking.
PayFrame.config.button = {
parent: "#submitPayment",
value: "Pay Now",
};All configuration parameters are accessed inside the PayFrame.config.button = {} object. See the following table for details on each parameter:
Parameter | Type | Description |
|---|---|---|
| string | The element ID of the |
| string | The PayFrame submit payment button label. |
Automate Payment Form Popup
To display the PayFrame payment form automatically or based on another function's result, use the popup function option for control over the checkout experience. Manually calling PayFrame.popup is recommended to align the payment form with other webpage elements, like a customer cart checkout.
PayFrame.popup()Submit Payment Button
The PayFrame library provides an embedded Submit button displayed on the payment form. This button securely sends transaction information to the platform for processing when the customer has completed entering their information using the Merchant’s ID and authentication credentials.
Style Your Payment Form
After configuration, initializing the PayFrame library, and setting up button functionality, you can customize the PayFrame interface look and feel.
PayFrame.config.color = "E0D5FC";
PayFrame.config.name = "Demo Name";
PayFrame.config.description = "This is a Demo";
PayFrame.config.image = "http://example.com/images/square_logo.jpg";All configuration parameters are accessed using PayFrame.config. PayFrame offers customization options to tailor the payment form to meet specific Merchant requirements, shown in the following table:
Parameter | Type | Description | Notes and Valid Values |
|---|---|---|---|
| string | Sets the background color for the PayFrame header text and submit button. | This parameter uses standard six-digit hex triplet formatting without the preceding hashtag. |
| string | The primary text displayed in the PayFrame form header. | N/A |
| string | The secondary text displayed below the form header. | N/A |
| string (URL) | Sets an image, such as a Merchant’s logo, to be displayed on the form. | Must be a valid public URL or hosted using the Payrix Portal PayFrame Configurations page. |
| boolean | Hides billing address inputs from the PayFrame form. | Valid Values:
Note: This customization is useful for pre-filled billing address information. |
Define Your Callback Functions
PayFrame offers callback functions for transaction responses. Customize the user journey with UI features like success messages or checkmarks for successful payments, troubleshooting messages for failures, and a completed transaction response that removes the payment form for seamless checkout. Make sure to update these functions to work seamlessly with the Merchant's checkout page:
// Successful Payment
PayFrame.onSuccess = function(response) {
console.log('Success');
console.log(response);
}
// Completed Transaction
PayFrame. = function(response) {
console.log('Finish');
console.log(response);
}
// Failed Payment
PayFrame.onFailure = function(response) {
console.log('Failure');
console.log(response);
}
// PayFrame Validation Failure
PayFrame.onValidationFailure = function(response) {
console.log('Failure');
console.log(response);
}The following table defines each of the callback response options available through PayFrame:
Callback Response | Callback Function | Description |
|---|---|---|
Successful Payment |
| Defines the next action following a successful transaction response from the PayFrame service. |
Completed Transaction |
| Defines the next action following a failed transaction response from the PayFrame service. |
Failed Payment |
| Defines the next action following a PayFrame error being returned. |
PayFrame Validation Failure |
| Defines the next action after any transaction response, successful or failed, from the PayFrame service. |
PayFrame Integration Example
The following example consolidates all the setup steps into a single HTML webpage with a PayFrame payment form integration:
<!DOCTYPE html>
<html lang="en">
<head>
<meta charset="UTF-8">
<meta name="viewport" content="width=device-width, initial-scale=1.0">
<title>PayFrame Integration</title>
<!-- Include the latest stable release of jQuery and the Sandbox PayFrame script -->
<script type="text/javascript" src="https://code.jquery.com/jquery-2.2.4.min.js"></script>
<script type="text/javascript" src="https://test-api.payrix.com/payFrameScript"></script>
<style>
.container {
max-width: 600px;
margin: 50px auto;
padding: 20px;
border: 1px solid #ccc;
border-radius: 5px;
background-color: #f9f9f9;
}
.button {
background-color: #17a2b8;
color: white;
padding: 10px;
border: none;
border-radius: 5px;
cursor: pointer;
width: 100%;
text-align: center;
}
.list-item {
margin-bottom: 10px;
padding: 10px;
border: 1px solid #ccc;
border-radius: 5px;
background-color: white;
}
#responseValue {
margin-top: 20px;
padding: 10px;
background-color: #e9ecef;
border-radius: 5px;
}
</style>
</head>
<body>
<div class="container">
<div class="list-item">
<div id="submitPayment"></div>
</div>
<div id="responseValue"></div>
</div>
<script>
PayFrame.config.apiKey = "ab123c4def5g6hijkl7890m12345no6p"; // Required
PayFrame.config.merchant = "t1_mer_123ab4c567defg8h90123i45"; // Required
PayFrame.config.amount = 500; // Required
PayFrame.config.txnType = 'sale'; // Required.
PayFrame.config.mode = 'txnToken'; // Required.
PayFrame.config.name = "Title";
PayFrame.config.description = "Description";
PayFrame.config.color = "E0D5FC";
PayFrame.config.image = "http://example.com/images/logo.jpg";
PayFrame.config.button = {
parent: "#submitPayment",
value: "Pay Now",
};
PayFrame.config.billingAddress = {
 address: "123 Main Street",
 city: "New York",
 state: "NY",
 zip: "10001",
 email: "[email protected]",
 phone: "555-555-5555"
};
PayFrame.onSuccess = function (response) {
document.getElementById('responseValue').innerHTML = "Success:<br />" + JSON.stringify(response, null, 4);
};
PayFrame.onFailure = function (response) {
document.getElementById('responseValue').innerHTML = "Failure:<br />" + JSON.stringify(response, null, 4);
};
PayFrame.onFinish = function (response) {
document.getElementById('responseValue').innerHTML = "Finish:<br />" + JSON.stringify(response, null, 4);
};
document.getElementById('submitPayment').addEventListener('click', function () {
PayFrame.popup();
});
</script>
</body>
</html>PayFrame Setup Configuration Reference
See the following reference table for a comprehensive list of all PayFrame.config parameters:
Setup Parameter | Type | Description | Notes and Valid Values | |
|---|---|---|---|---|
| string | A limited-use token for securely authorizing Merchant PayFrame transactions. | Use for secure, limited-use access. Do not use with the For more information about Transaction Session Keys, see Integrated Payment Pages: Best Practices. | |
| string | The Merchant authentication method for the PayFrame library used to authorize payment submissions. | Do not use with For steps on setting up rolling API key workflows, see Integrated Payment Pages: Best Practices. | |
| string | The Payrix Pro ID of the Merchant processing the transactions. | N/A | |
| integer | The transaction amount in cents. | Example:
| |
| string | The type of transaction being processed. | Valid Values:
| |
| string | Defines how PayFrame handles card tokenization and sale transactions, with or without saving the payment method. | Valid Values:
| |
| object | Customer's billing address details for prefilling the form | N/A | |
| string | The customer’s address. | N/A | |
| string | The customer’s street address. | N/A | |
| string | The customer’s state or province. | N/A | |
| string | The customer’s postal code. | N/A | |
| string | The customer’s email address. | N/A | |
| string | The customer’s phone number. | N/A | |
| object | Configuration for displaying a button to open the payment form. | N/A | |
| string | The element ID of the | N/A | |
| string | The PayFrame submit payment button label. | N/A | |
| string | Sets the background color for the PayFrame header text and submit button. | This parameter uses standard six-digit hex triplet formatting without the preceding hashtag. | |
| string | The primary text displayed in the PayFrame form header. | N/A | |
| string | The secondary text displayed below the form header. | N/A | |
| string (URL) | Sets an image, such as a Merchant’s logo, to be displayed on the form. | Must be a valid public URL or hosted using the Payrix Portal PayFrame Configurations page. | |
| boolean | Hides billing address inputs from the PayFrame form. | Valid Values:
Note: This customization is useful for pre-filled billing address information. | |
Tip
See PayFrame: Digital Wallet Payments for details on integrating payment options like Apple Pay and Google Pay.
Launch Your PayFrame Integration
You can test your PayFrame integration in the Sandbox environment after completing the required steps to configure and initialize the library. While testing, you can further customize the appearance, functionality, and post-response actions to your Merchant’s checkout page.
When you’re ready to launch your PayFrame integration in the Production environment to process live customer payments, use the following steps:
Add the PayFrame Production Script: Replace the Sandbox environment PayFrame script with the Production script.
<script type="text/javascript" src="https://api.payrix.com/payFrameScript"></script>Add the Merchant’s Production ID and API Key: Update the Merchant ID and authentication method to their Production environment values.
PayFrame.config.apiKey = "bc234d5efg6h7ijklm8901n23456op7q"; // Production
PayFrame.config.merchant = "p1_mer_123ab4c567defg8h90123i45"; // Production
Result: After making the required production updates, your PayFrame integration is now live, and Merchant’s customers can begin submitting payments.