.png)
PayFrame
PayFrame embeds a Payrix-hosted payment form on a merchant’s checkout page. PayFrame includes basic customization options and requires minimal development effort to implement.
PayFrame adds a secure payment submission form to your checkout page. PayFrame creates a seamless customer experience and ensures that all transactions are processed securely and satisfy all PCI requirements. The PayFrame JavaScripts support customization and callback functions, which make it easy to refine the appearance and behavior of the form. The images below show the customer facing payment experience:
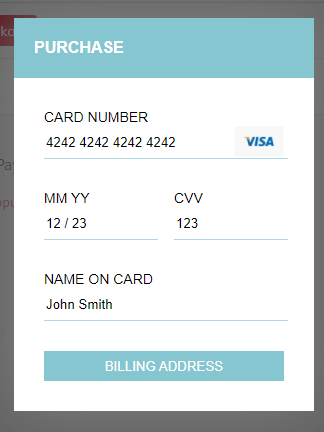
The customer enters payment info and clicks the Billing Address button.

The customer enters the billing address and clicks the PAY button.
This page includes the information for Partners that want to use PayFrame to add a payment form to a merchant's checkout page:
Quickstart - Sample code for creating a basic payment form.
Integration - Detailed instructions for adding a payment form to a checkout page.
Create the payment form - Initialize the payment form and set your API key and the merchant ID.
Display the payment form - Use a button or popup to display the form.
Submit the transaction - Your customer submits the transaction to Payrix using a button on the payment form.
Handle the response - Use the PayFrame callback functions to notify the customer of the transaction results and provide additional options.
Customization - Descriptions of PayFrame's customization options and how to use them.
Quickstart
To get a basic payment form up and running quickly, copy the code below into an HTML file, add your {API Key} and {Merchant ID} on lines 7 and 8, and open the file in a web browser.
Your {API Key} and {Merchant ID} are available in the Payrix Portal.
Important Info for Canadian Merchants:
provincefields replace thestatefields (see valid values here).postalfields replacezipfields (see valid values here).currencywill be in CAD.
Integration
Integrating PayFrame with a merchant's checkout page requires including the PayFrame JavaScript and setting PayFrame configuration values in the payment page’s <head> section. The sections below describe how to create the form, display the form, submitting a transaction, and handle the transaction response.
Create the payment form
Follow the steps below to create a payment form on a merchant's checkout page:
Include the latest version of jQuery and the Payrix's payFrameScript at the top of the page:
HTML<!-- Include latest stable release of jQuery --> <script type="text/javascript" src="https://code.jquery.com/jquery-2.2.4.min.js"></script> <!-- Include the PayFrame JavaScript --> <script type="text/javascript" src="https://api.payrix.com/payFrameScript"></script>Initialize PayFrame by setting the
apiKey,merchant, andamountvalues in a<script>block at the top of the page:HTML<script> PayFrame.config.apiKey = "b57d7185174957f97b1a4b66350d845b"; PayFrame.config.merchant = "p1_mer_5a285faf1b79148f3500b9e"; PayFrame.config.amount = 500; </script>The initialization methods take the following values:
apiKey- Your Payrix API key, available in the Payrix Portalmerchant- The merchant's identifier on Payrix.amount- The amount in cents that the merchant will charge the customer.
Optional - Prefill the customer's billing address by setting a value for the
billingAddressfield in the PayFrame<script>block. By default, the payment form prompts the customer for a billing address. Prefilling the address can be more convenient for the customer if the merchant has stored the information. Include the code below in the PayFrame<script>block and set values for each field:JSPayFrame.config.billingAddress = { address: "", city: "", state: "", zip: "", email: "", phone: "" };
Display the payment form
Use a button or a popup to display the form, as described below:
Button
Configure the button in the PayFrame script block, as shown below:
PayFrame.config.button = {
    parent: "parent-pay",
    value: "Pay",
    class: "my-pay"
  };
Then, assign the parent-pay ID to the parent element that will contain the button object:
<div id="parent-pay"></div>PayFrame will display a button with the label set by the value field in the configuration. The payment form will open when the customer clicks the button.
Popup
To manually display the payment form, call the popup method. You can call the popup method along with the configuration scripts, as shown below, or use any other technique to trigger it:
PayFrame.popup()Submit the transaction
The payment form includes a "Submit" button that securely sends transaction information to Payrix for processing. When processing is complete, Payrix returns the response using on of the callback functions defined in the next section.
Handle the response
PayFrame returns transaction results using one of the following callback functions:
onSuccess- Executes if the transaction is successful. Display a purchase confirmation on the merchant's site and process the order as normal.onFailure- Executes if the payment fails. Display a failure notification on the merchant's site and correct the payment or cancel the order.onFinish- Executes whether the transaction succeeds or fails.
Add the code below to the <script> block with the rest of the PayFrame scripts. Then update the functions to work with the merchant's checkout page:
PayFrame.onSuccess = function (response) {
    // Process the responsePayFrame.config.billingAddress = {
  }
  PayFrame.onFailure = function (response) {
    // Process the response
  }
  PayFrame.onFinish = function (response) {
    // Process the response
  }
Customization
PayFrame supports the following customization options:
color- Sets the background color for header and button elements on the form.name- Sets the primary text displayed in the form header.description- Sets the secondary text displayed in the form header.image- Sets an image, such as a merchant’s logo, that will be displayed on the form.
Add the code below to the <script> block that contains the rest of the PayFrame functions. Then update the values to match the merchant's requirements:
PayFrame.config.color = "86C6D0";
PayFrame.config.name = "Demo Name";
PayFrame.config.description = "This is a Demo";
PayFrame.config.image = "<http://example.com/images/square_logo.jpg";>