.png)
Payrix App - PAX Terminal Full User Guide
This user guide demonstrates the features and improvements of the Semi-Integrated Payrix App utilizing the PAX Platform with PAX A-Series Mobile Devices.
TABLE OF CONTENTS
Overview
The Payrix App created for the PAX A-Series devices is an intuitive, easy-to-use application for processing payment transactions.
Key Features
Accepts all major credit and debit cards (Visa, Mastercard, American Express, Discover, etc.)
Supports Credit / Debit Card Swiping and Card Chip Insert, Tap (Contactless), as well as ApplePay, GooglePay, and SamsungPay.
Easily add a tip to the bill
Automatically calculate tax
Refund processing
Level II Data Collection
Receipt Printing
Transaction History
Payment data synchronized with your Payrix account in real-time
Terminal and Full-Service Modes
New Features and Improvements
Batch Close (now with Multi-Mid Support) New
Multi-Merchant Support New
Bluetooth Printer Support for PAX A60 using BP60A New
Centrally Managed Settings New
The Payrix App offers features uncommon to most payment transaction apps such as payment history with details, a locked-down terminal mode, and real-time syncing with your Payrix account.
Requirements
The Payrix App was designed and developed the PAX A-Series devices and has the following requirements:
A Payrix Account
PAX A-Series Device (see PAX for A-Series Mobile product list)
PAX PayDroid Operating System version 5.1.1 or later
BroadPOS Software with Multi-Mid support (Vantiv and RapidConnect Verified)
Network accessibility (WIFI)
Payrix Centralized Parameter Settings New
The new centralized parameter settings feature provides the ability to establish the settings for the devices from a central location. During the terminal setup process, the user will be prompted to establish the parameters for the device. These parameters will be pushed to the device, and the Payrix App will accept the parameters and establish the parameters as settings within the App. The service offers the ability to create templates for Payrix parameters. Then the template can be used for groups of terminals in a single push.
The parameters are structured in three sections, Administrator, Terminal Mode, and General Setting. Each section is described below.
Administrator Parameter Settings
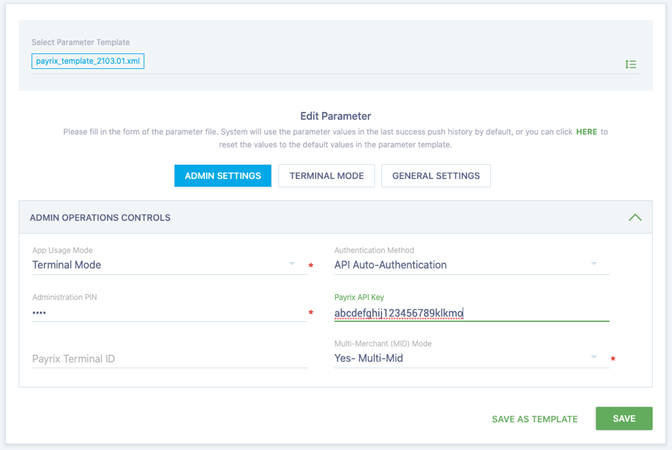
Parameters | Description |
|---|---|
App Usage Mode | App Usage Modes:
|
Authentication Method | Authentication Method Options:
|
Administration PIN | Allows the user to establish a PIN that can be used to gain access to administration functions in the Payrix App, such as exiting the app and returning to the PAX device launch screen. |
Payrix API Key | This field allows the customer to enter an API key for credential authentication and App access. This field is required if the user wishes to use API authentication or “Out of Box” Auto-Configuration of the device. |
Payrix Terminal ID | This field is the Payrix terminal id of a merchant terminal created for this device. This field is required if the default Auto-Configuration is to be used. |
Multi-Merchant ID (MID) Mode | Multi-Merchant ID (MID) Modes: Yes, Multi-MID – Configures the device for transactions to be processed from multiple merchants. No, Single-MID – Configures the device for transactions to be processed from only a single merchant. |
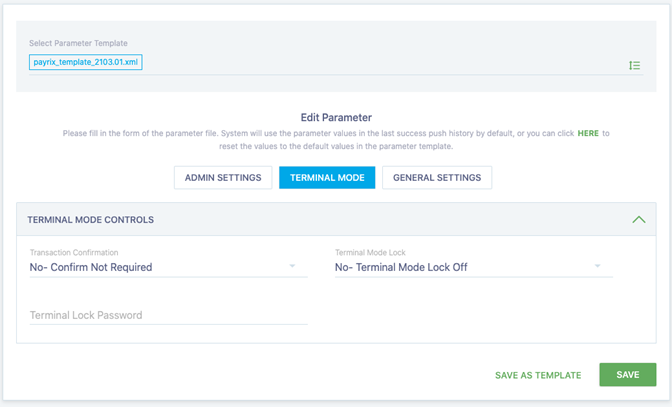
Terminal Mode Parameter Settings
Parameter | Description |
|---|---|
Transaction Confirmation | Transaction Confirmation Options: No – Confirm Not Required – An API Terminal Activation confirmation screen will not be displayed and instead the user will be taken directly to the transaction payment screen. Yes – Confirmation Required – where a confirmation screen is displayed before proceeding to the transaction payment screen. |
Terminal Mode Lock | Terminal Mode Lock Options: No / Terminal Mode Lock Off – Allows the App user to switch between Terminal Mode or Full-Service Mode without any authorization checks. Yes / Terminal Mode Lock-On – The App user is restricted to only Terminal Mode access, and to exit Terminal Mode requires either the provided Terminal Lock Password (following next parameter field) or the Admin PIN. |
Terminal Lock Password | This field captures the password for the above Terminal Mode Lock. |
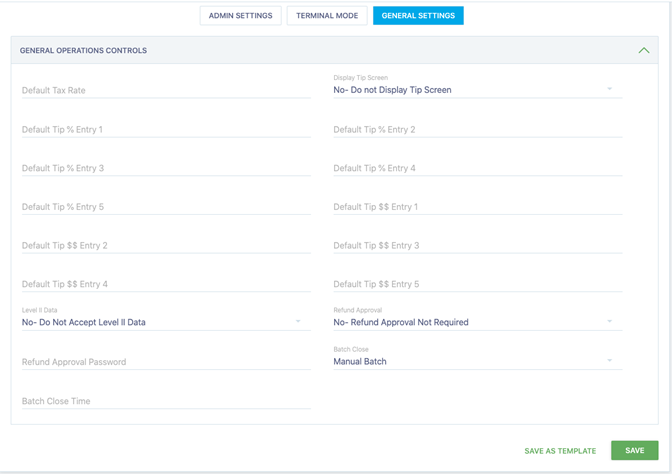
General Parameter Settings
The General Settings tab allows the user to configure all remaining device parameter settings such as tax rates, default tips, Level II Data collection, refund approval controls, and even Batch Out options and times. This allows the client to create “Out of Box” Auto-Configuration plans for their merchant devices.
Payrix App Features
Version 2.0 Startup and Initialization New
Several new features were introduced with this version of the Payrix App for PAX. There is a new screen that provides a status of the progress of the startup. An important feature of the startup is that any revisions to the parameters or merchant available in multi-merchant mode would automatically be adjusted and integrated during this startup process.
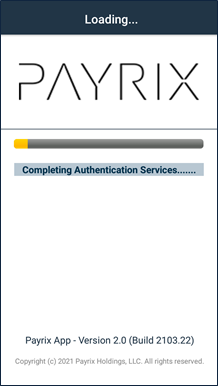
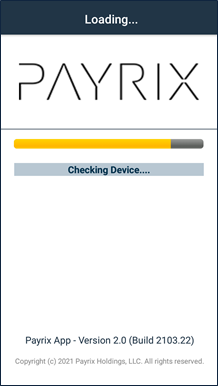
The new startup process goes through various steps during setup and displays messages like those above as the software proceeds and completes.
The startup process also checks the type of device that is being used. If the device is an A60 that supports printing on a BP60A Bluetooth printer, the App will also check if the user wishes to use such a printer, and if requested handle the connection, as seen in the following two screens.
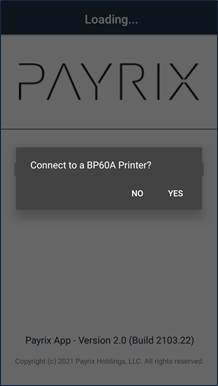
This screen gives the user the option of connecting to a BP60A receipt printer.
If NO is selected, the App will continue on with the remainder of the startup process.
If YES is selected, the App will display any BP60A printers that may have previously “Paired” with the device and App.
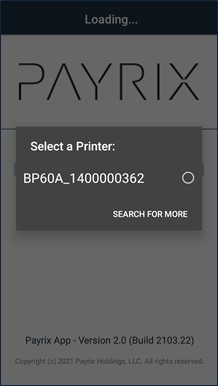
This screen allows the user to select available BP60A receipt printers.
If the desired printer is not displayed, the user can tap the “Search of More” button and the App will scan for additional BP60A printers that may have been recently added. If no previously paired printers were located, the App will automatically scan for additional printers.
Once a printer is selected it will be connected to the App software and will be used in any printer function.
IMPORTANT PAX VANTIV BROADPOS NOTE:
As of the current PAX Vantiv BroadPOS version V1.02.09E_20201210 there is a defect in the Vantiv BroadPOS software where all printing to Bluetooth printers does not work. PAX has acknowledged this flaw and is working to correct it and have it available in their next Vantiv BroadPOS release.
The Rapid Connect BroadPOS software does work correctly.
Any printing driven by the Payrix App and not the BroadPOS software does work and performs to specification.
General: Slide Out Menu
The Slide Out Menu provides access to all of the Payrix App features:
Authentication
Sale – Full-Service Mode
Terminal Mode
History
Batch
Settings
Merchant Settings
Default Taxes
Preset Tip Values
Terminal Mode
Refund Authorization
Batch Close Settings
Reprint Last Receipt
About
Exit (with Admin PIN)
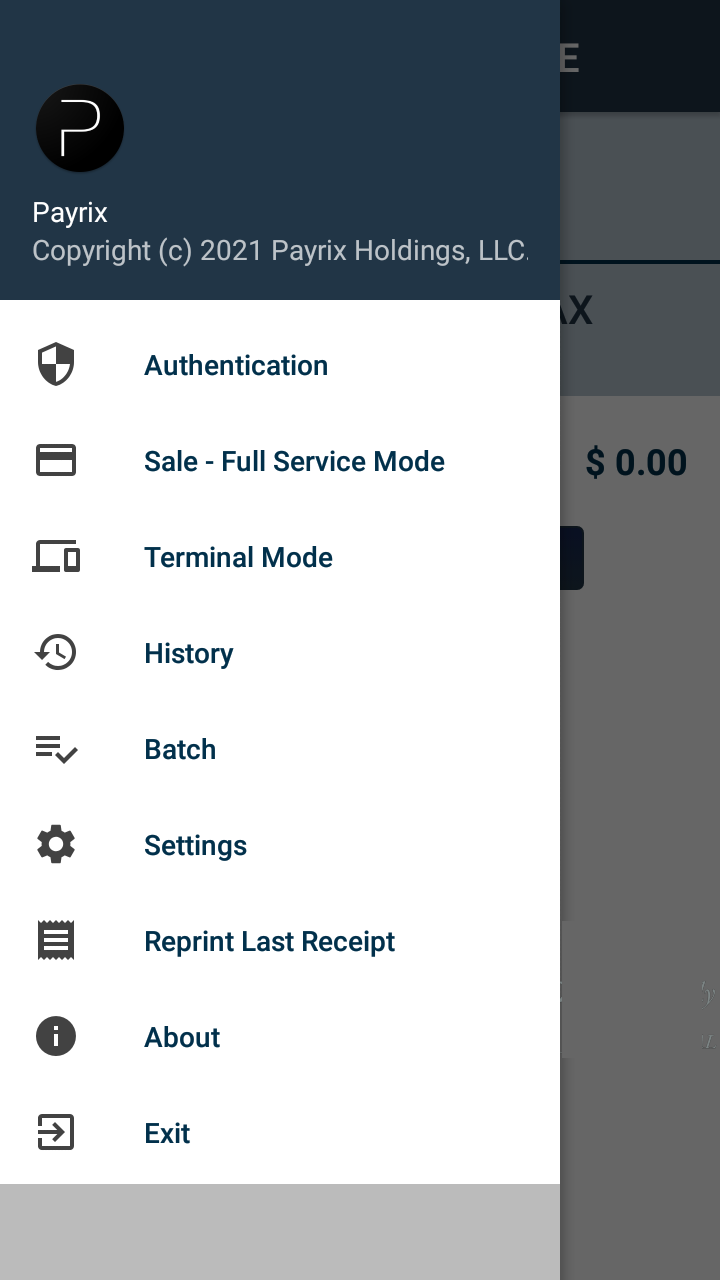
Slide Out Menu Display
Credentials Authentication
The authentication of the device is a key first step in using the Payrix app for transaction processing. There are a few prerequisites to using a PAX A-Series device with the Payrix App. Here are a couple of those steps but work with your account representative to ensure you are ready.
You must have a Payrix account
The device must be registered as a terminal in the merchant’s Payrix account and the device must be cloud-enabled
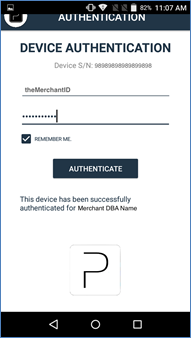
Credential Login / Authentication Page
Once this is done you are ready to begin. Note: If ever you need the device serial number, it can be found on the top section of this screen.
After the user enters their credentials and taps the Authenticate button, the following tasks are performed:
The credentials are authenticated. If the authentication fails, a message is displayed, and the device cannot be used for transaction processing.
If the credentials are valid, the merchant account is then checked for this particular device. If the device is not located, a message is displayed, and the device cannot be used for transaction processing.
If the device is located, then several other key steps are completed and the device is authenticated, and a success message is displayed.
Then the user is automatically returned to the last screen they were on, either the Full-Service Mode or Terminal Mode screen.
Full-Service Mode
In Full-Service Mode, the user has access to all of the features of the Payrix App. This includes being able to process transactions locally on the device without being initiated by a separate POS or Web Portal. This capability also can serve as a backup capability to Terminal Mode if there is an issue or communications problem with the POS, where a transaction can be entered directly on this device.
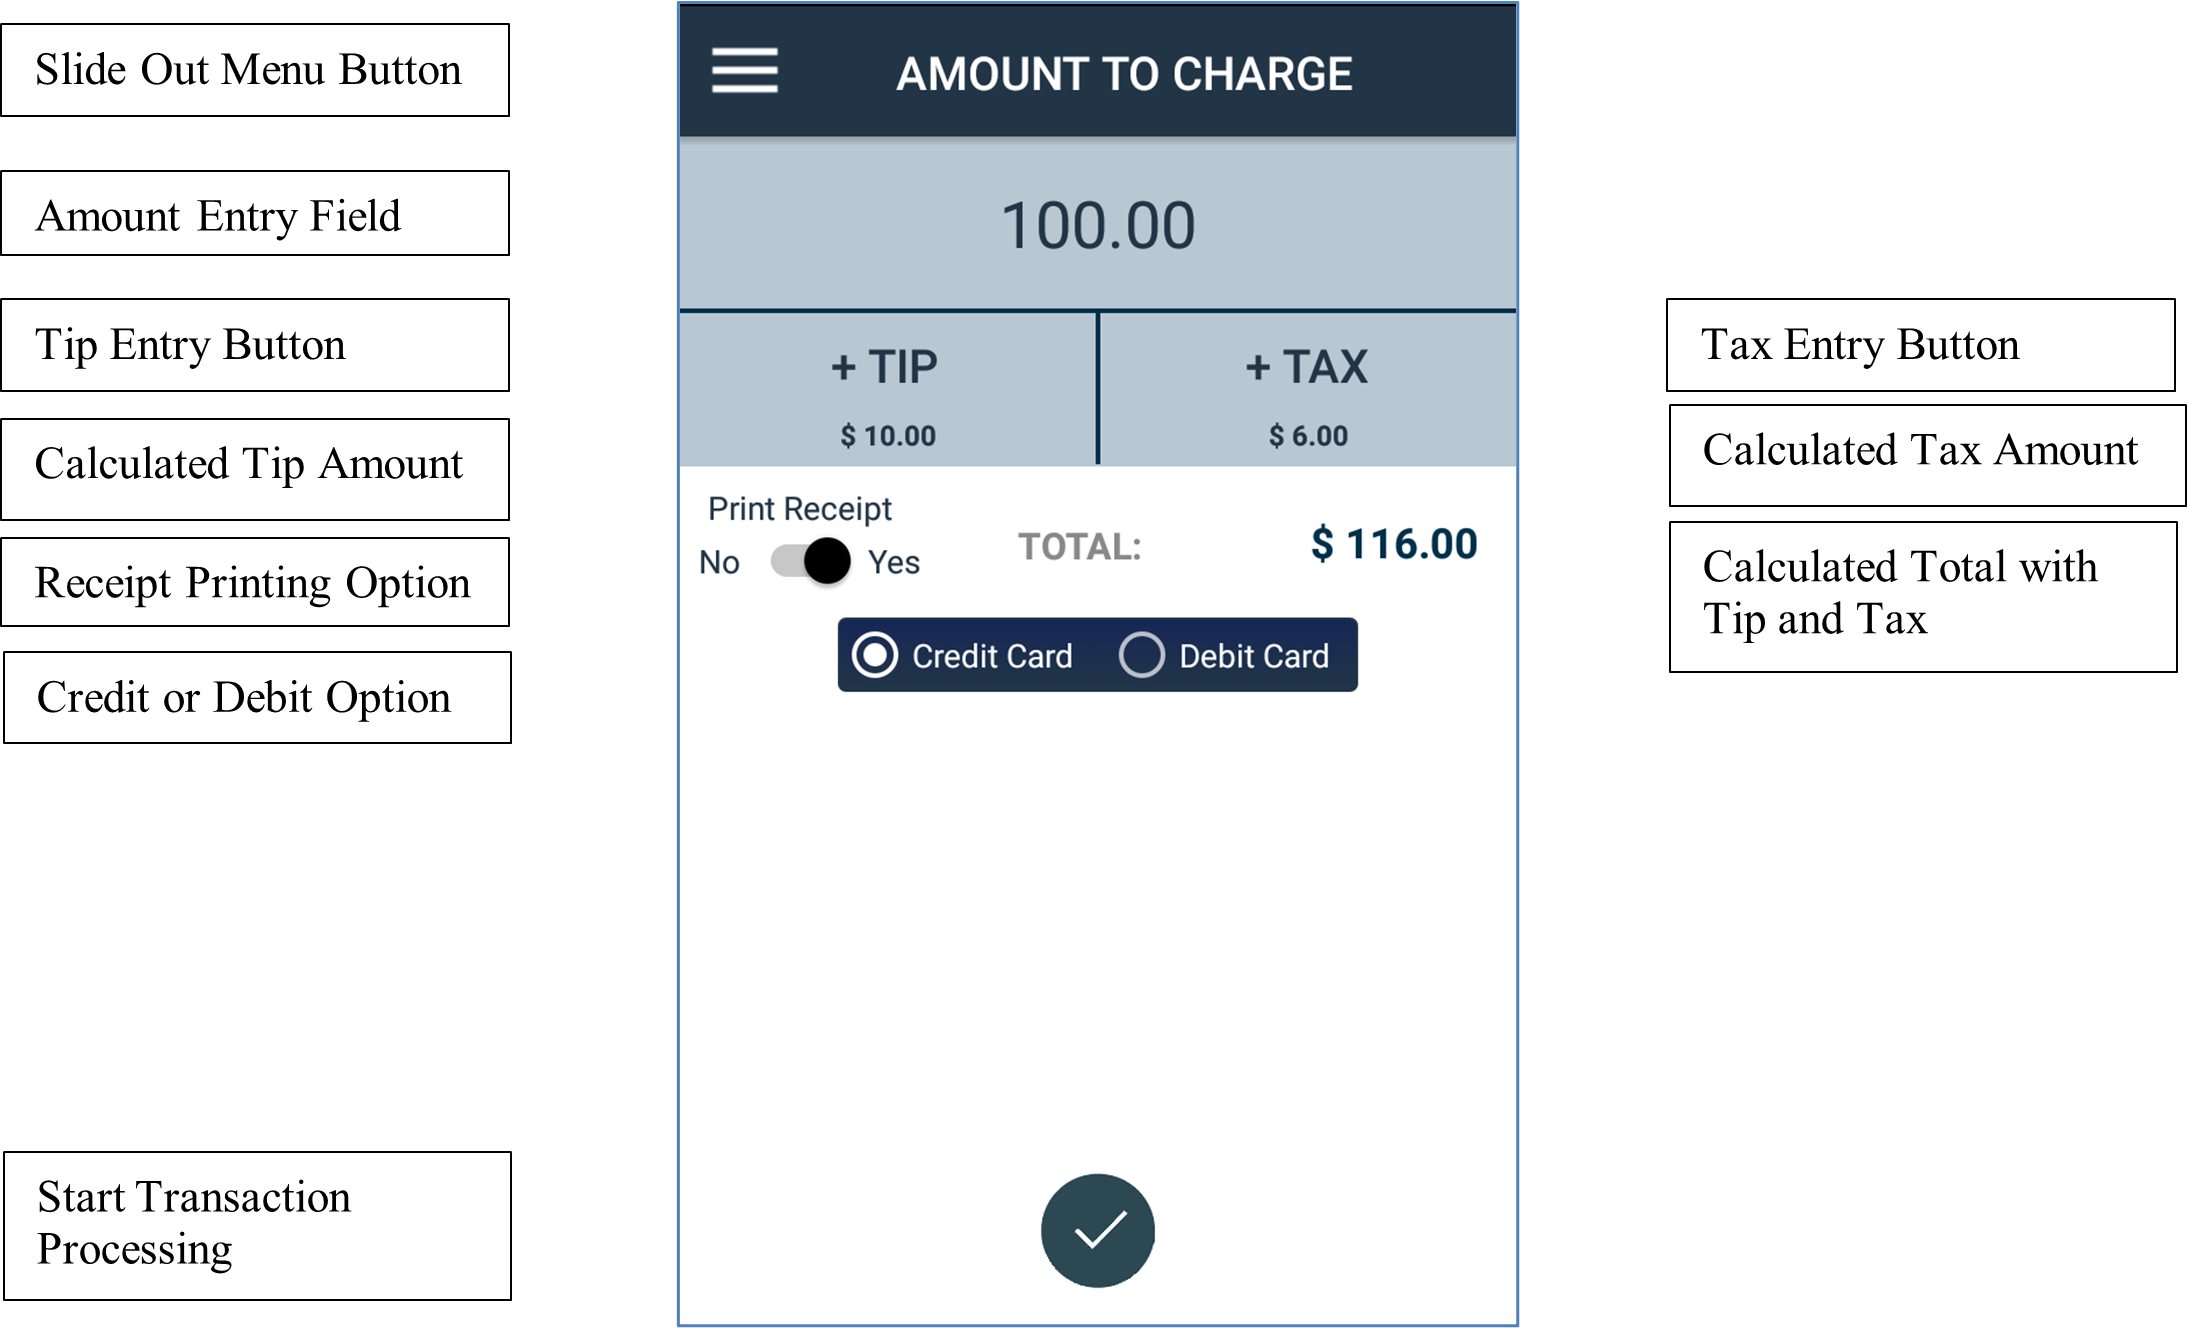
Amount Entry View
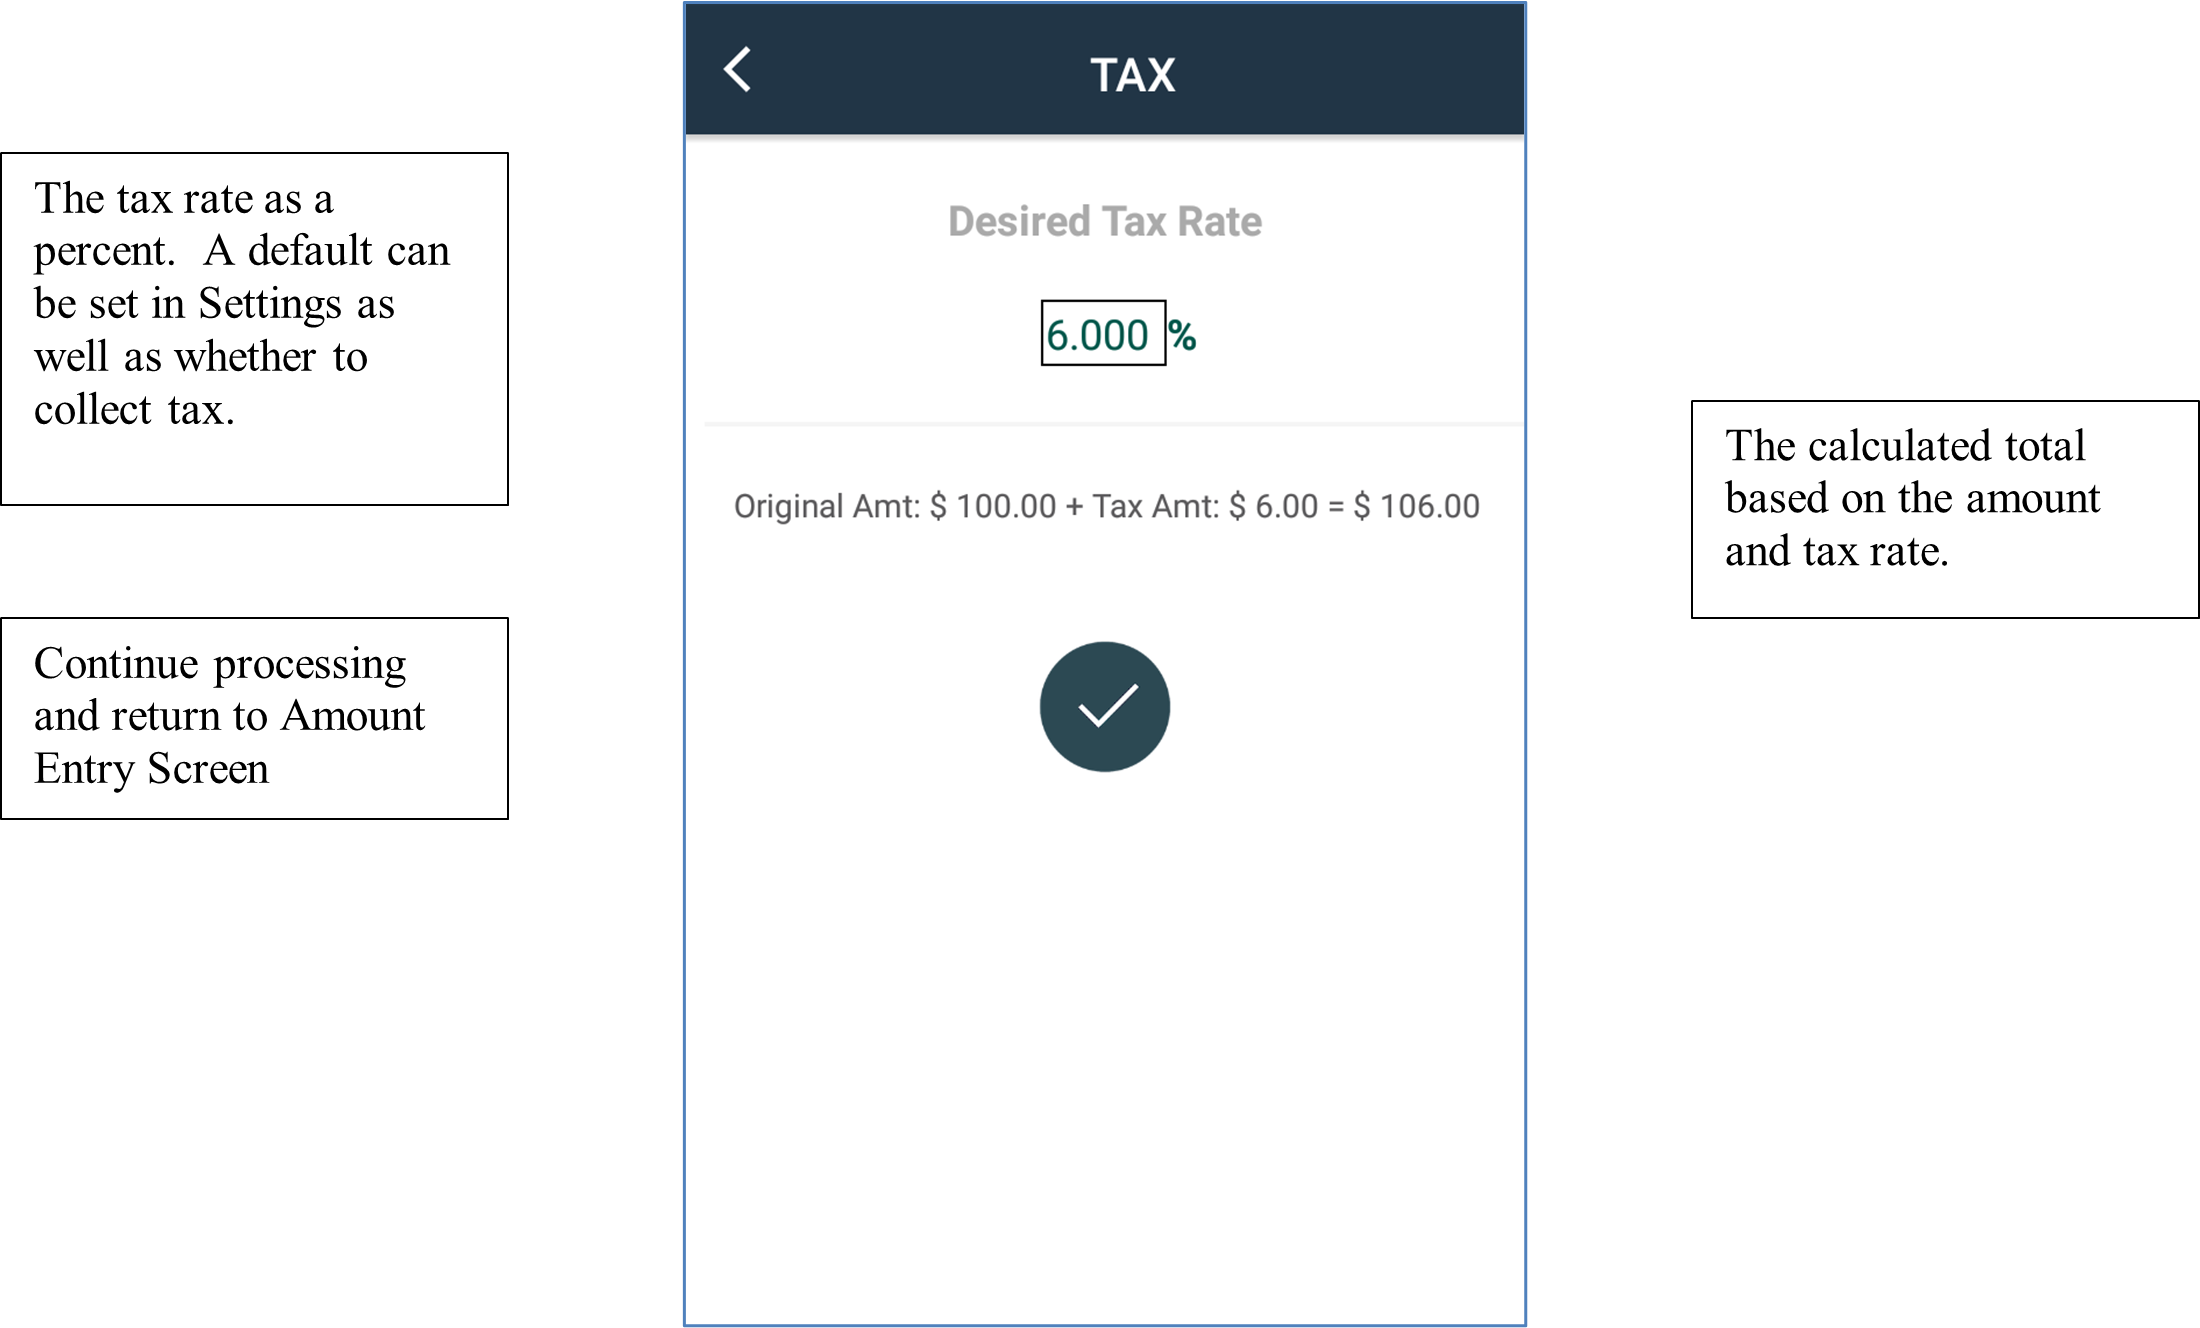
Tax Entry View
This screen is optional and can be accessed by tapping the “+Tax” button on the Amount Entry Screen reviewed earlier.
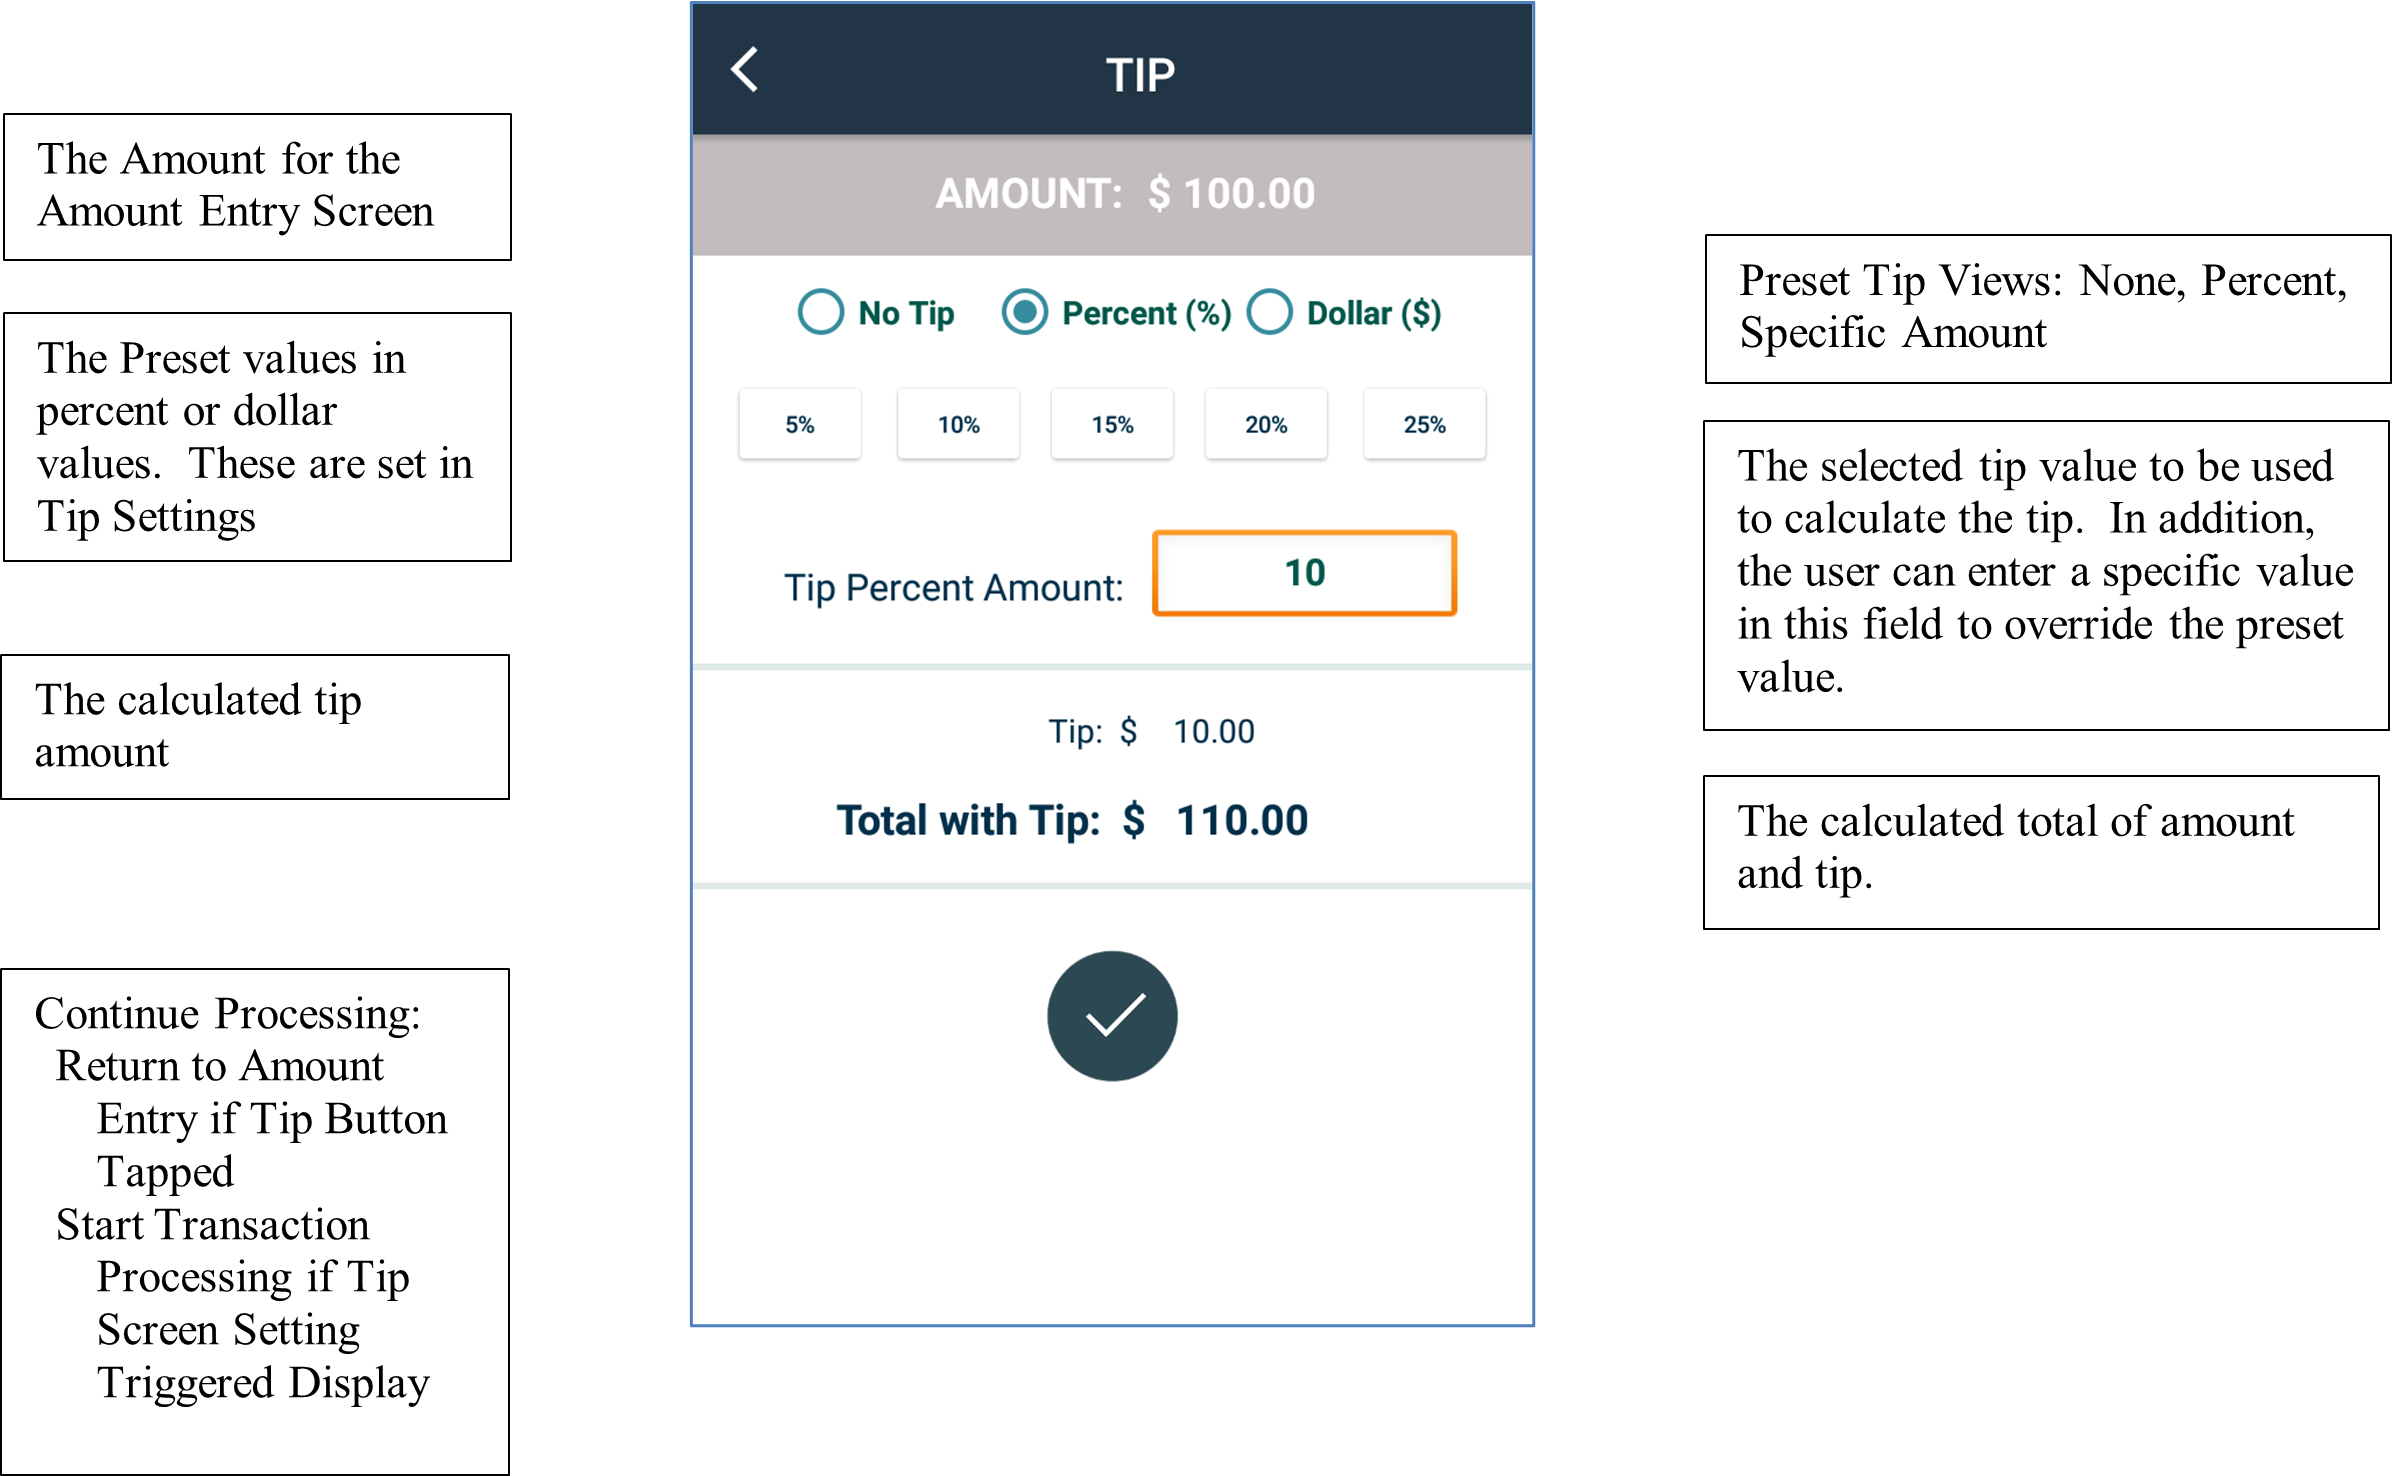
Tip Entry View
This screen is optional and can be accessed in two ways. The first way is to tap the “+Tip” button on the Amount Entry Screen reviewed earlier, or by setting the “Tip Screen” to on in Tip Settings. This will have the app automatically display the Tip screen after the Amount Entry Screen. Tip Setting is reviewed later in this document.
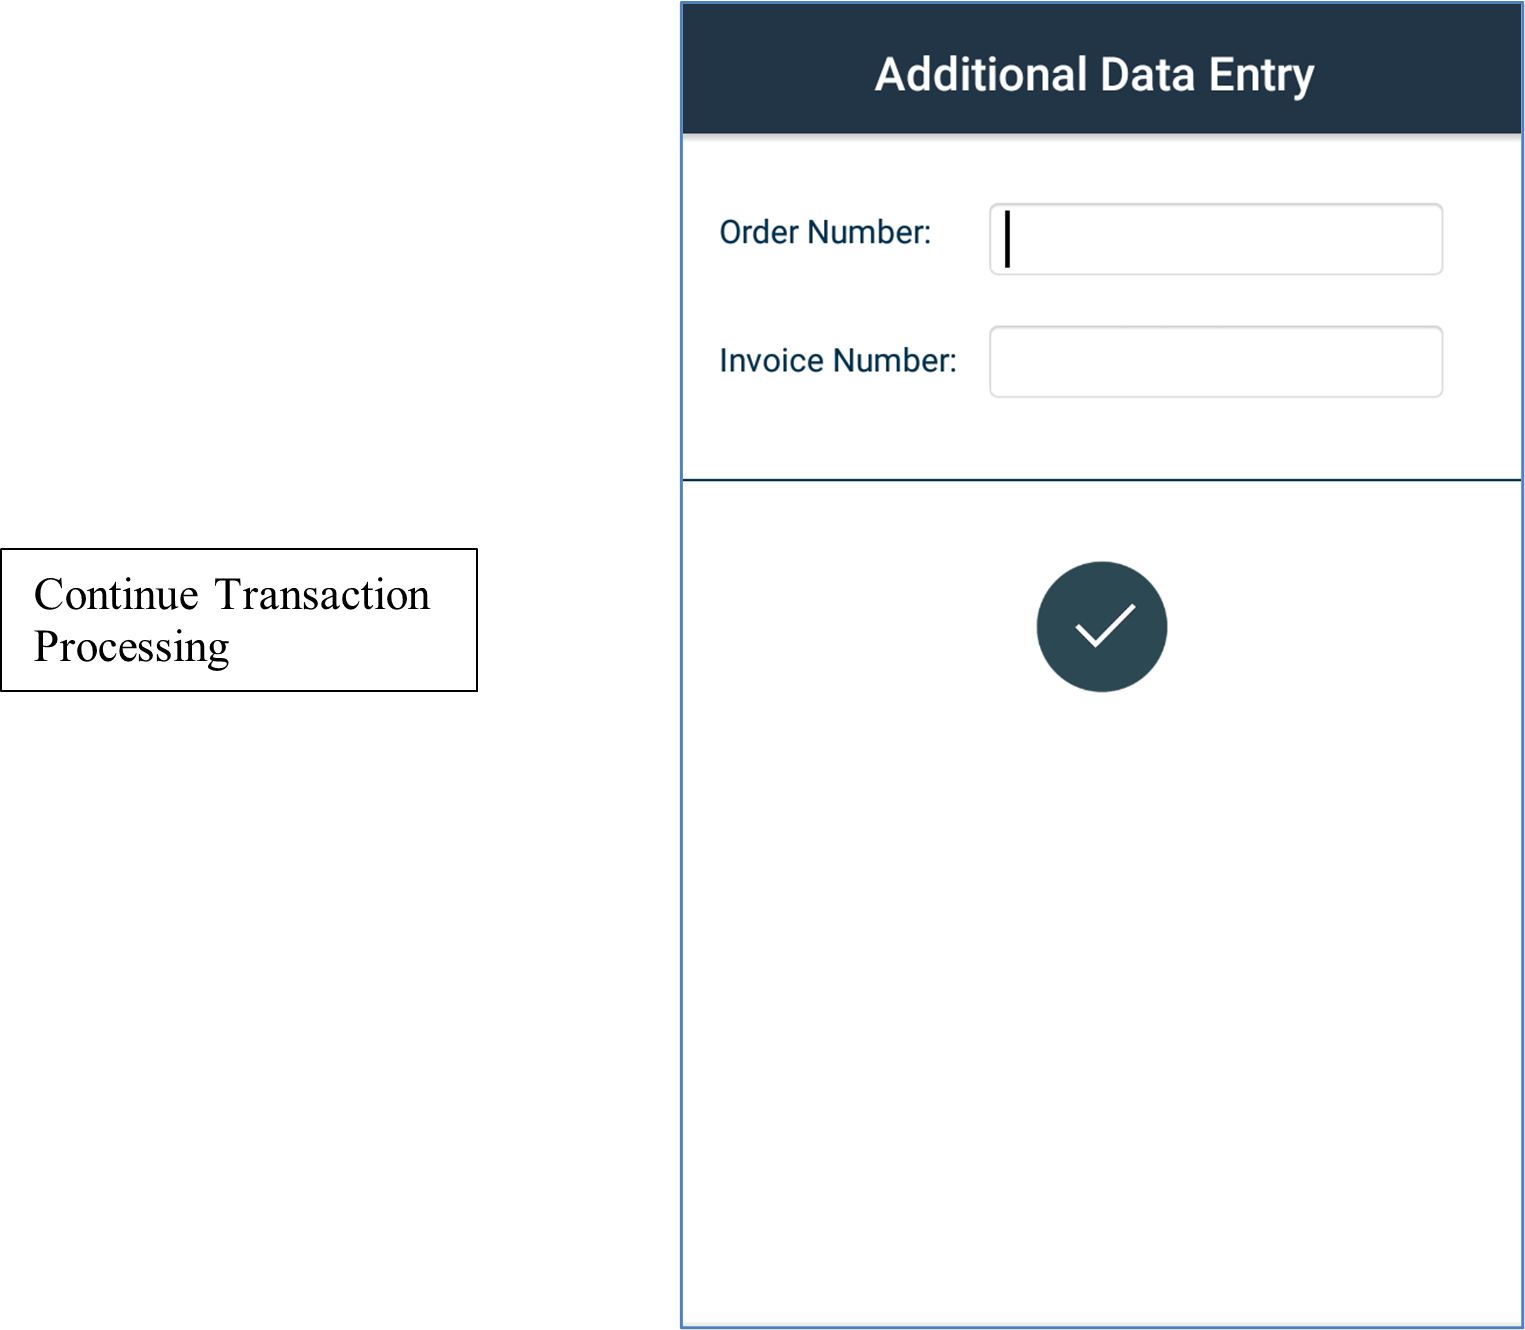
Additional (Level II) Data Entry View
This screen is optional and can only be accessed by setting “Request Order #” in Merchant Settings. This allows the user to enter the Order Number and the Invoice Number if available.
Payment Selection Views
The next screens show the typical screens that are next displayed to capture payment card information. The left screen is always displayed, while the right screen is displayed when a PIN number is required. The left screen will accept a valid credit or debit card that can be entered via a Swipe, Chip Insert, Tapped (for Chip Contactless Entry), Manual Entry, or by using ApplePay, GooglePay, or SamsungPay.

If the device accepts the card, where it is not damaged and is a valid and working card, the transaction is processed with the Processor (Example: Vantiv/WorldPay), and the transaction is either Approved or Declined. If the transaction was a successful Swipe transaction, a signature screen will be displayed.
Once the transaction is processed the app also syncs the transaction information with the Payrix gateway.
Processed Transaction Views
The following two screens are for Successful and Failed transactions. Once these screens are exited the user is returned to the originating screen, either Amount Entry of Full-Service Mode or the waiting screen of Terminal Activation Mode.
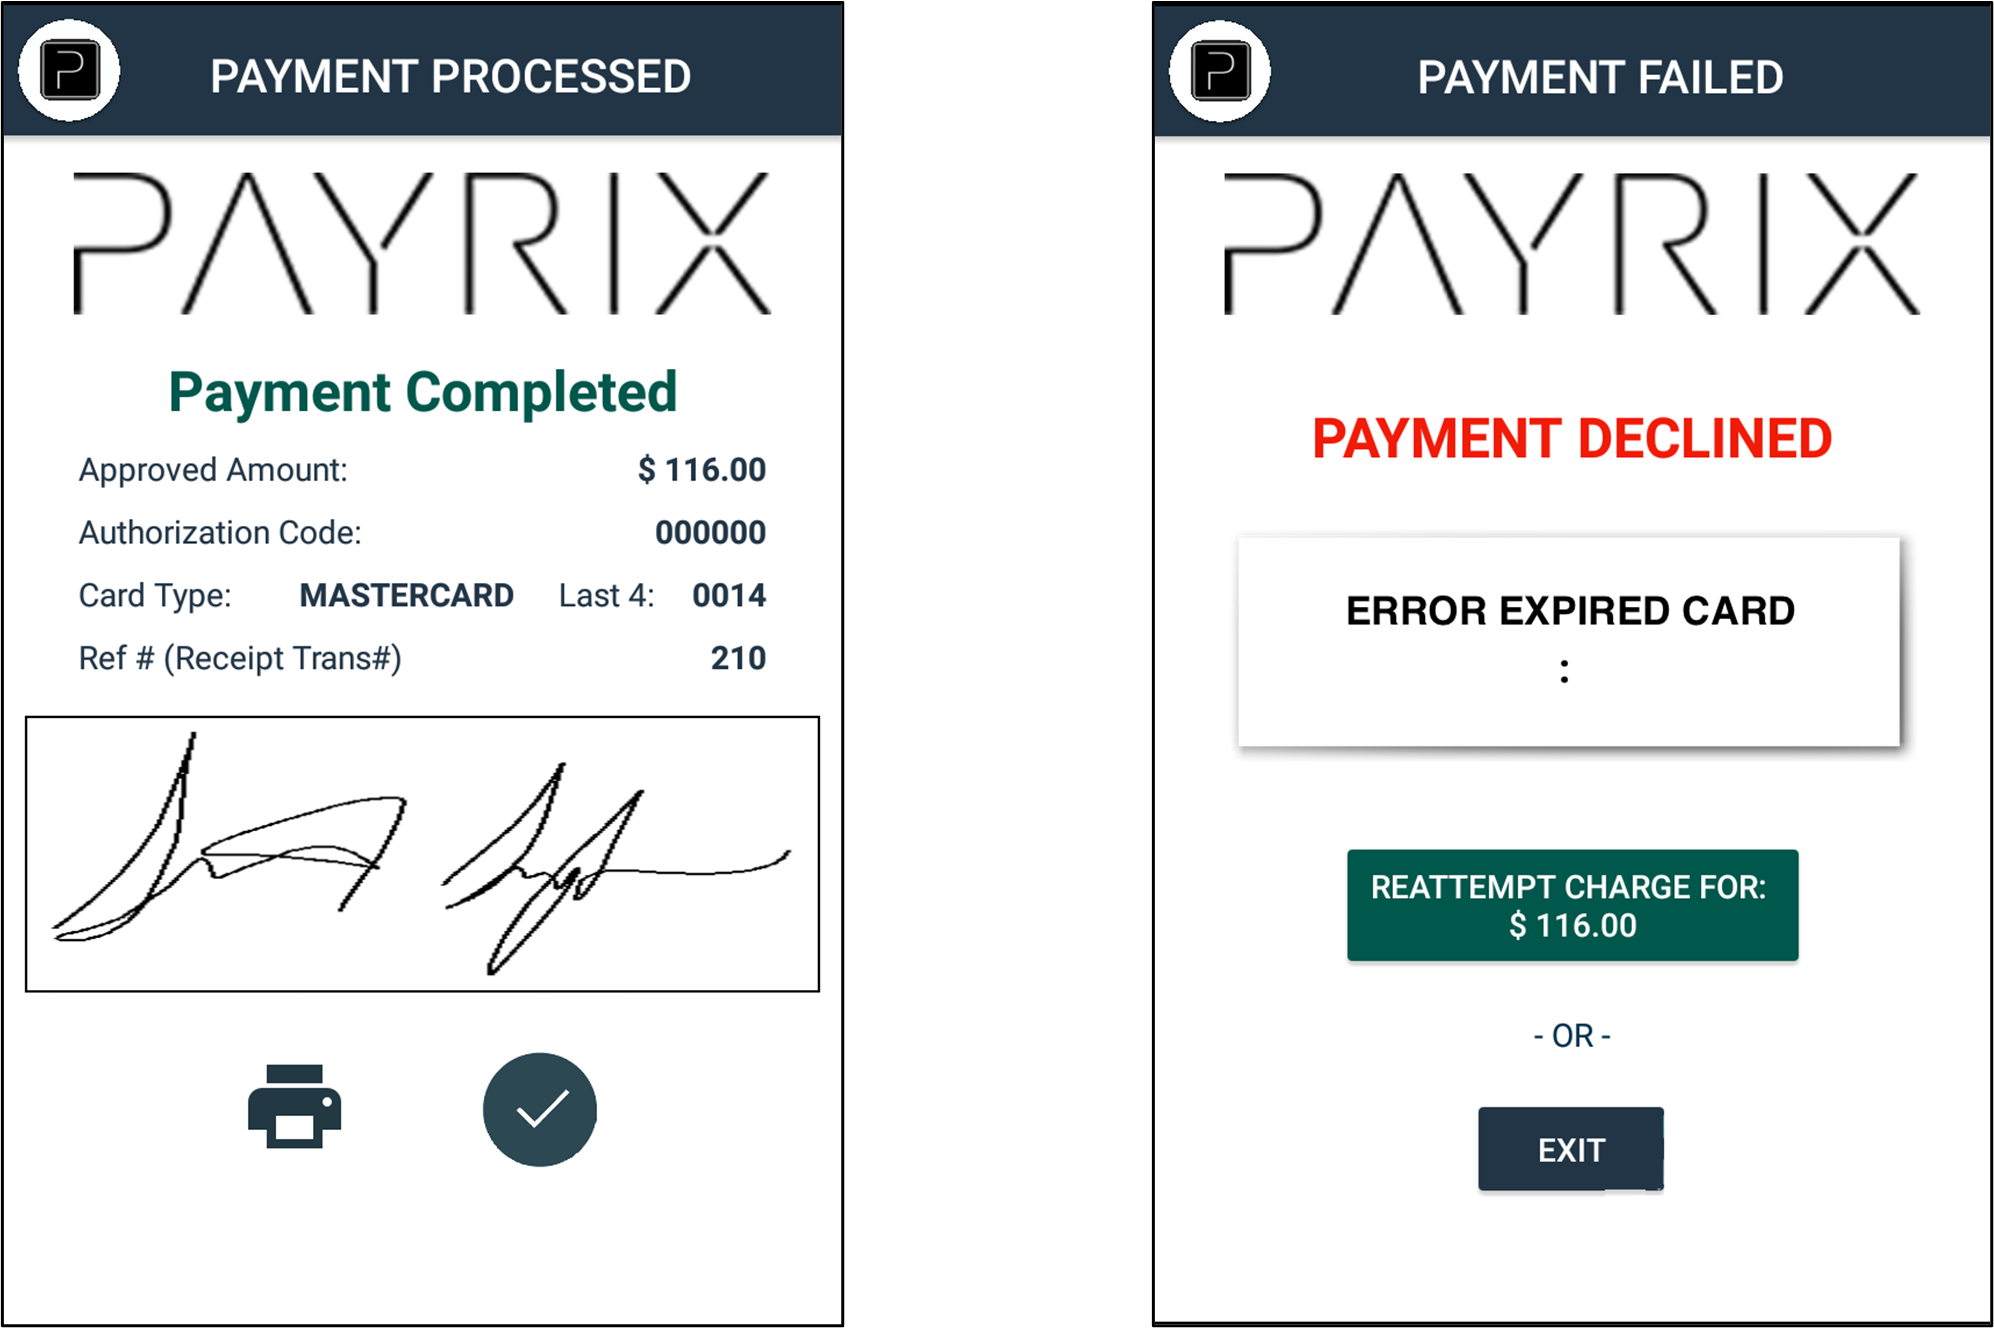
The signature box on the success screen is only displayed for Swipe or Manual entries where a signature is required.
The printer icon allows the user to reprint the receipt.
For declined payments, a message will appear describing why the decline occurred and the option to reattempt the charge. The reattempt button does not appear if the request was initiated by an API Terminal Activation request. This is because the POS workstation that initiated the request may have a different process for handling a charge reattempt.
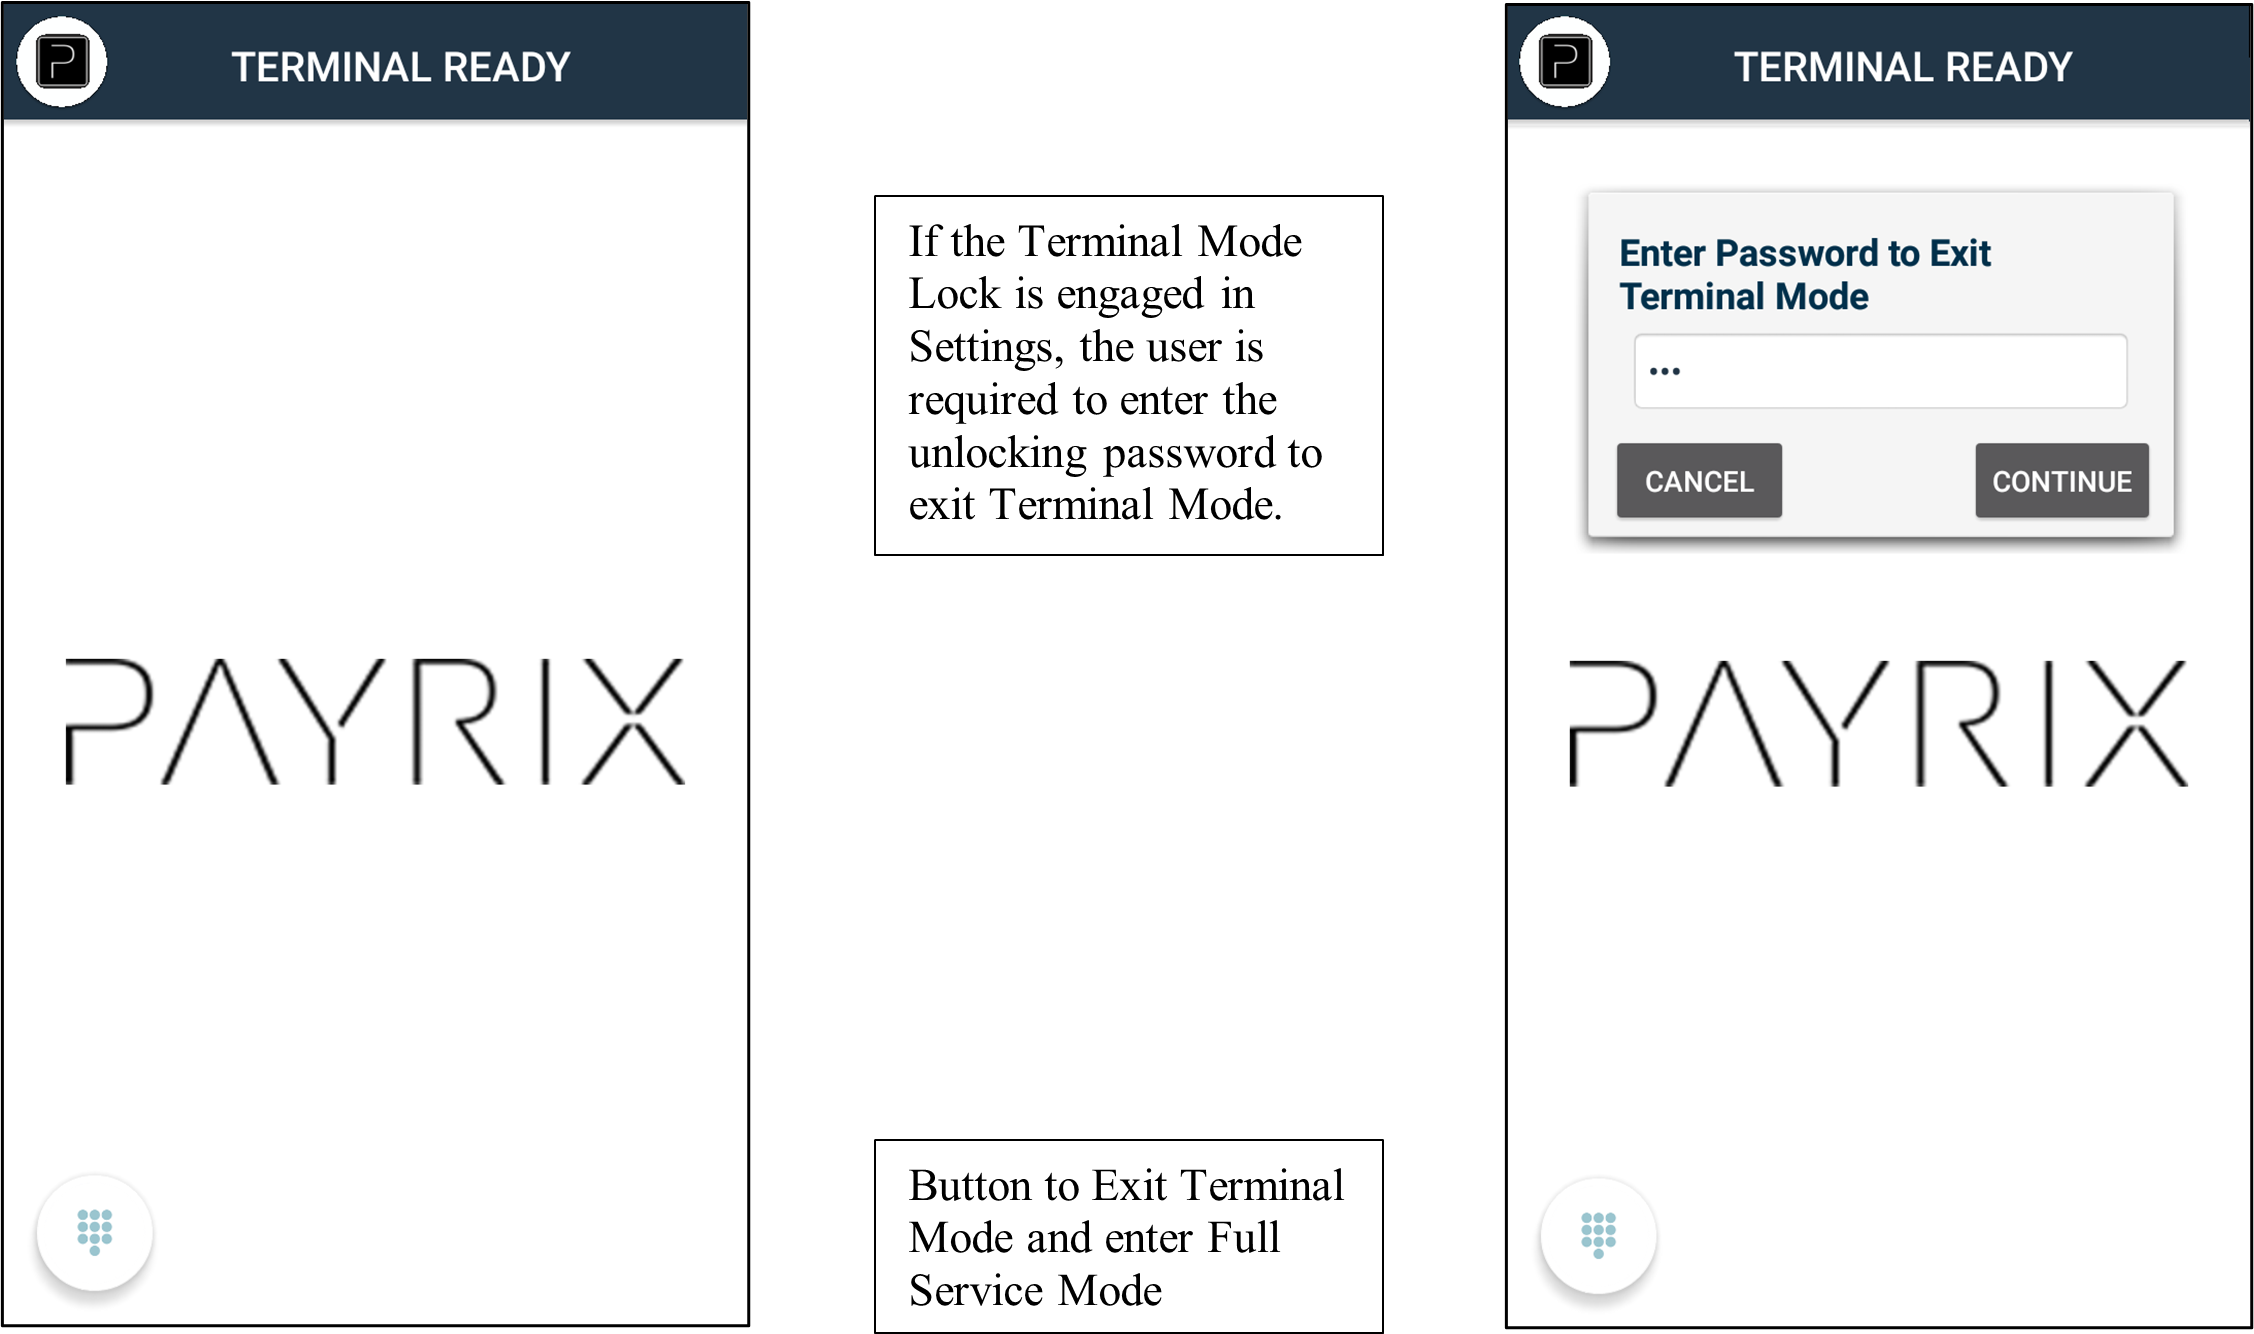
Terminal Mode
The Terminal Mode feature in the Payrix App is a special feature from Payrix that makes the PAX A-Series device perform like a card reader terminal connected to a POS workstation. This feature along with the Terminal Mode-Locked capability and the app’s auto-boot capability can turn the A-Series device into a dedicated and protected card reader terminal. The left screen is waiting for a transaction to be sent from a POS workstation via the Payrix API.
Terminal Activation Confirmation
If while in Terminal Mode a Terminal Activation payment request is received, and audible tone alerts the user, and the following confirmation screen is displayed.
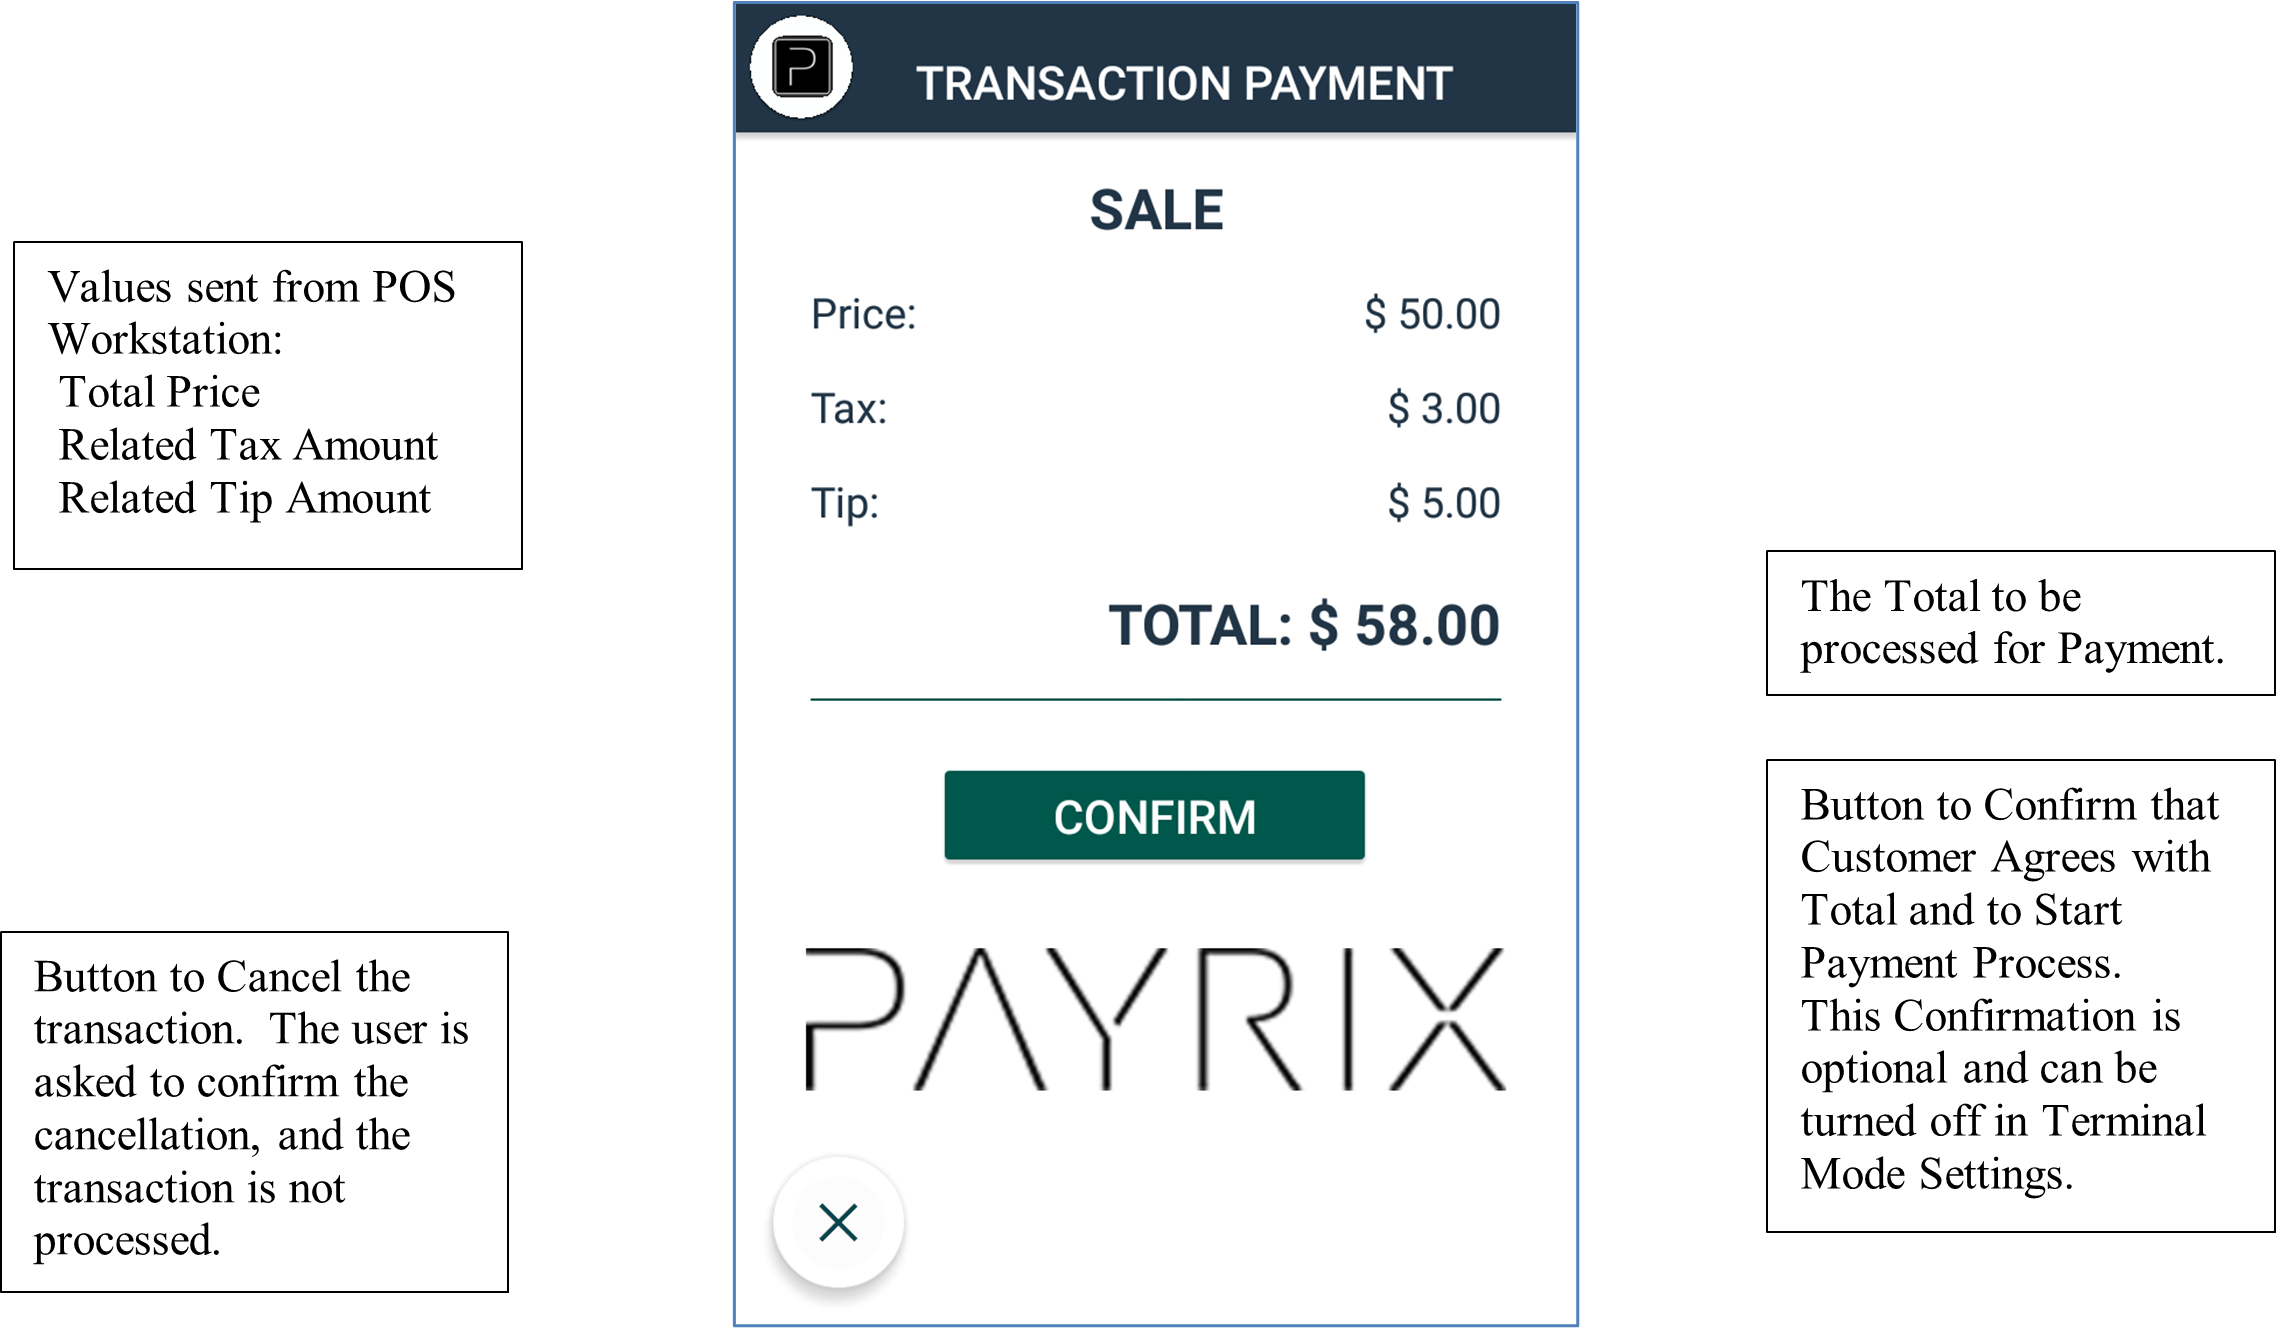
Once the information displayed is confirmed and the user taps “Confirm”, if required, then the transaction will begin processing and the remainder of the screens displayed is the same as Full-Service Mode shown on pages 7 and 8. Once the transaction processing is complete the user is returned to the Terminal Mode wait screen.
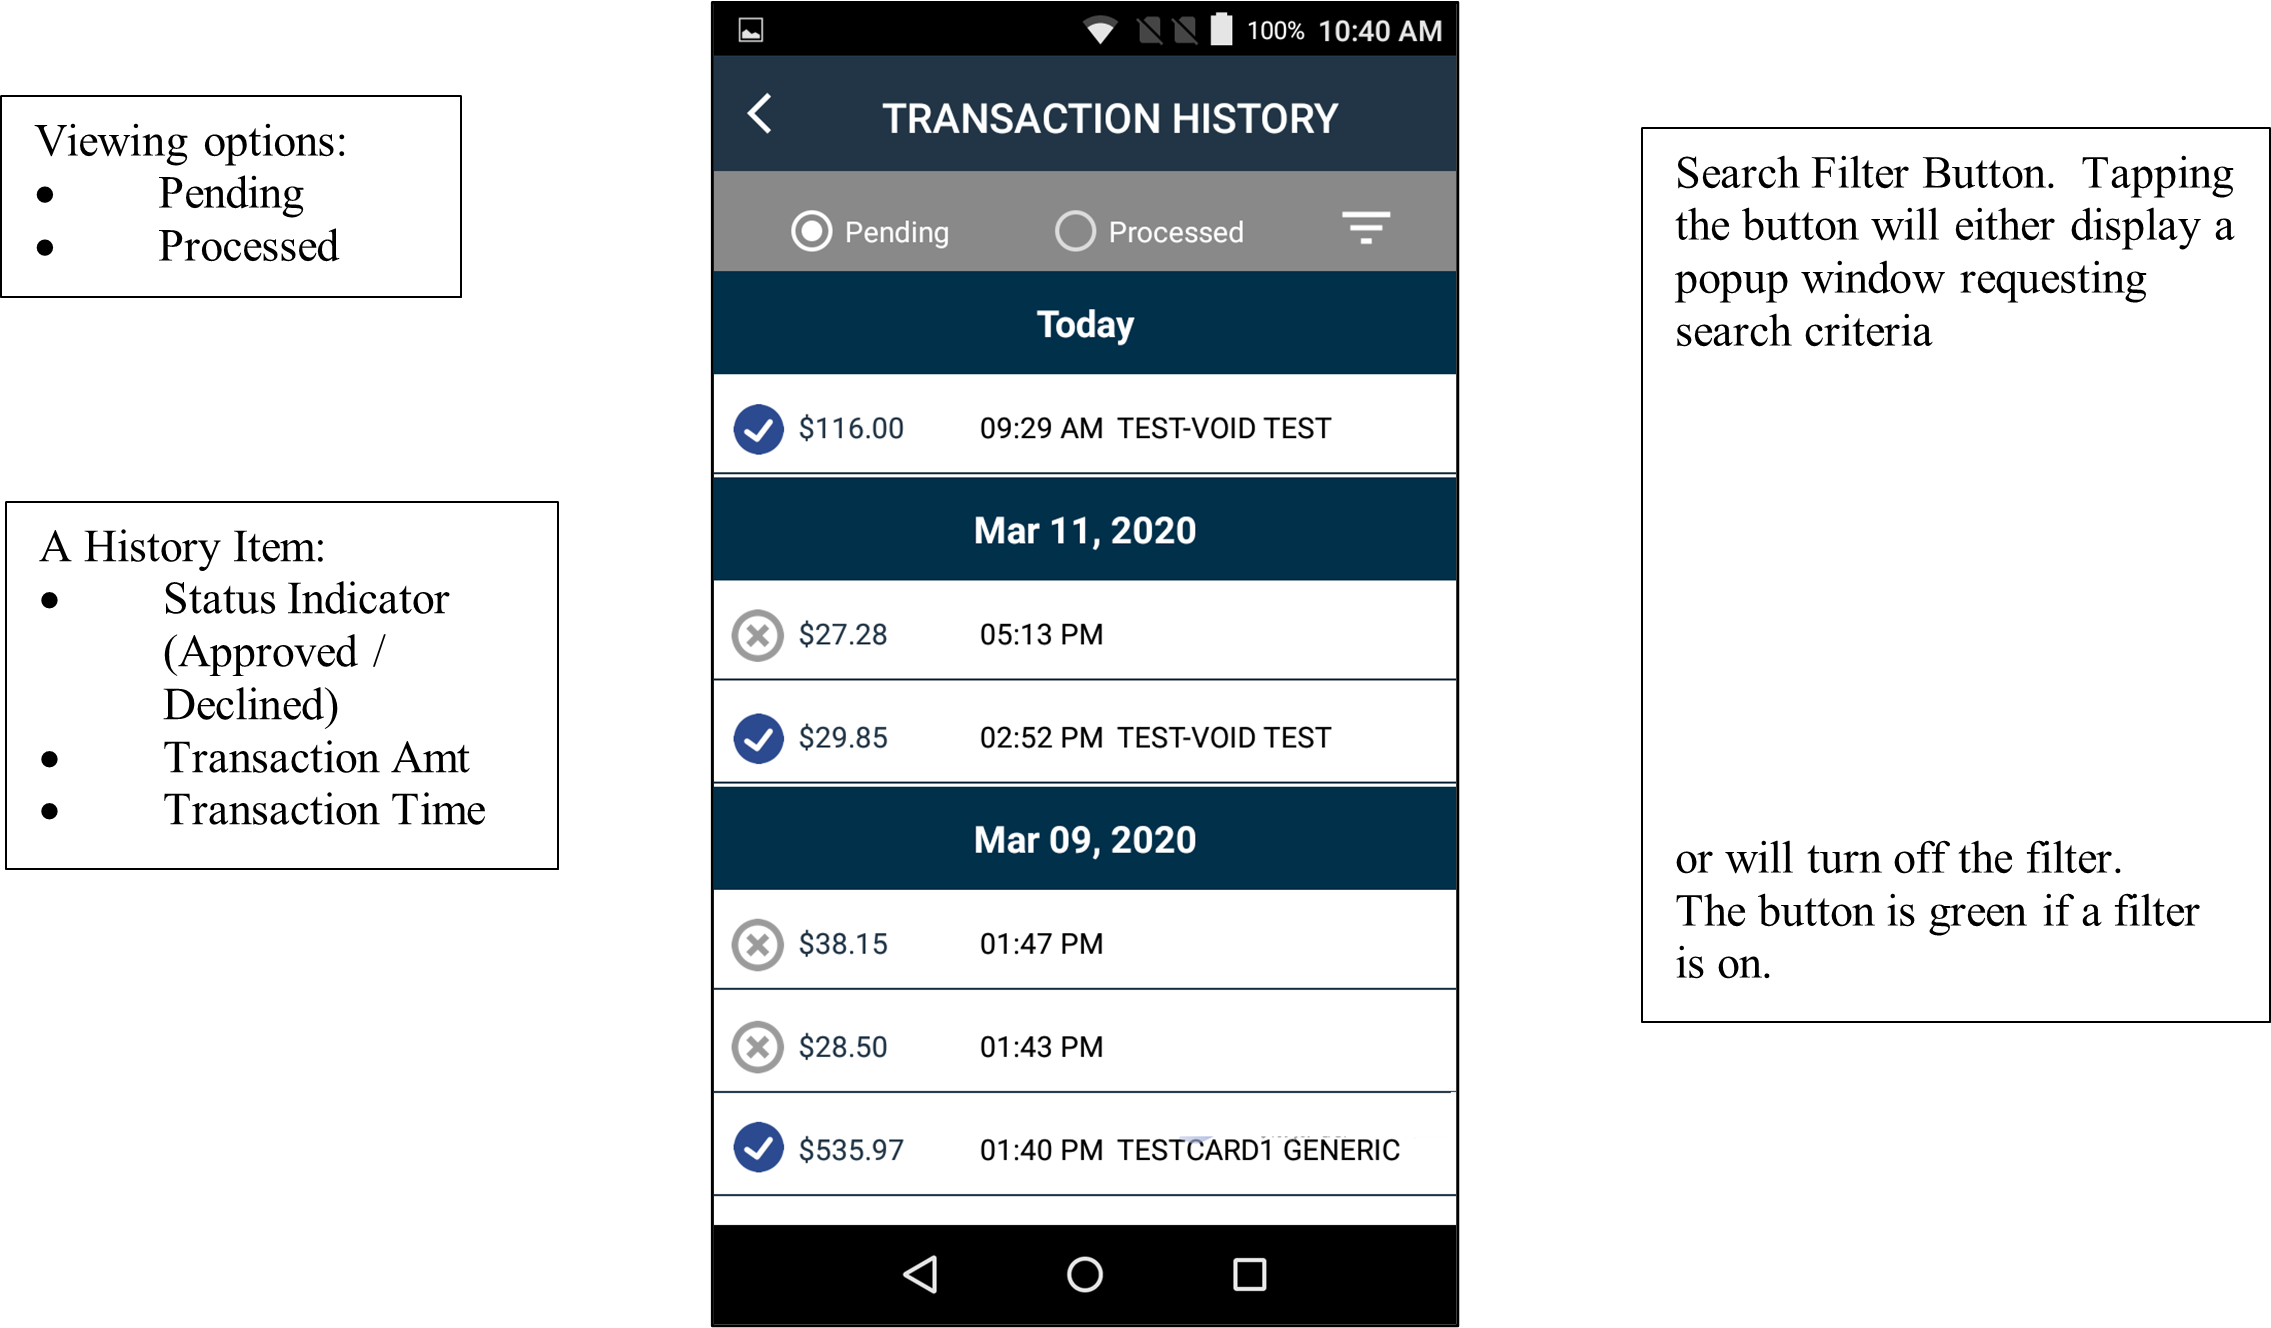
History
History List View
The purpose of the History List is to show transactions currently being processed for this device (Pending) or completed transactions for this merchant (Processed). The filtering capability allows the user to narrow the results list by entering a specific amount or a specific/partial customer name.
History Details View
If a transaction is selected from the History List a History Details screen is displayed providing specific information available for that transaction.
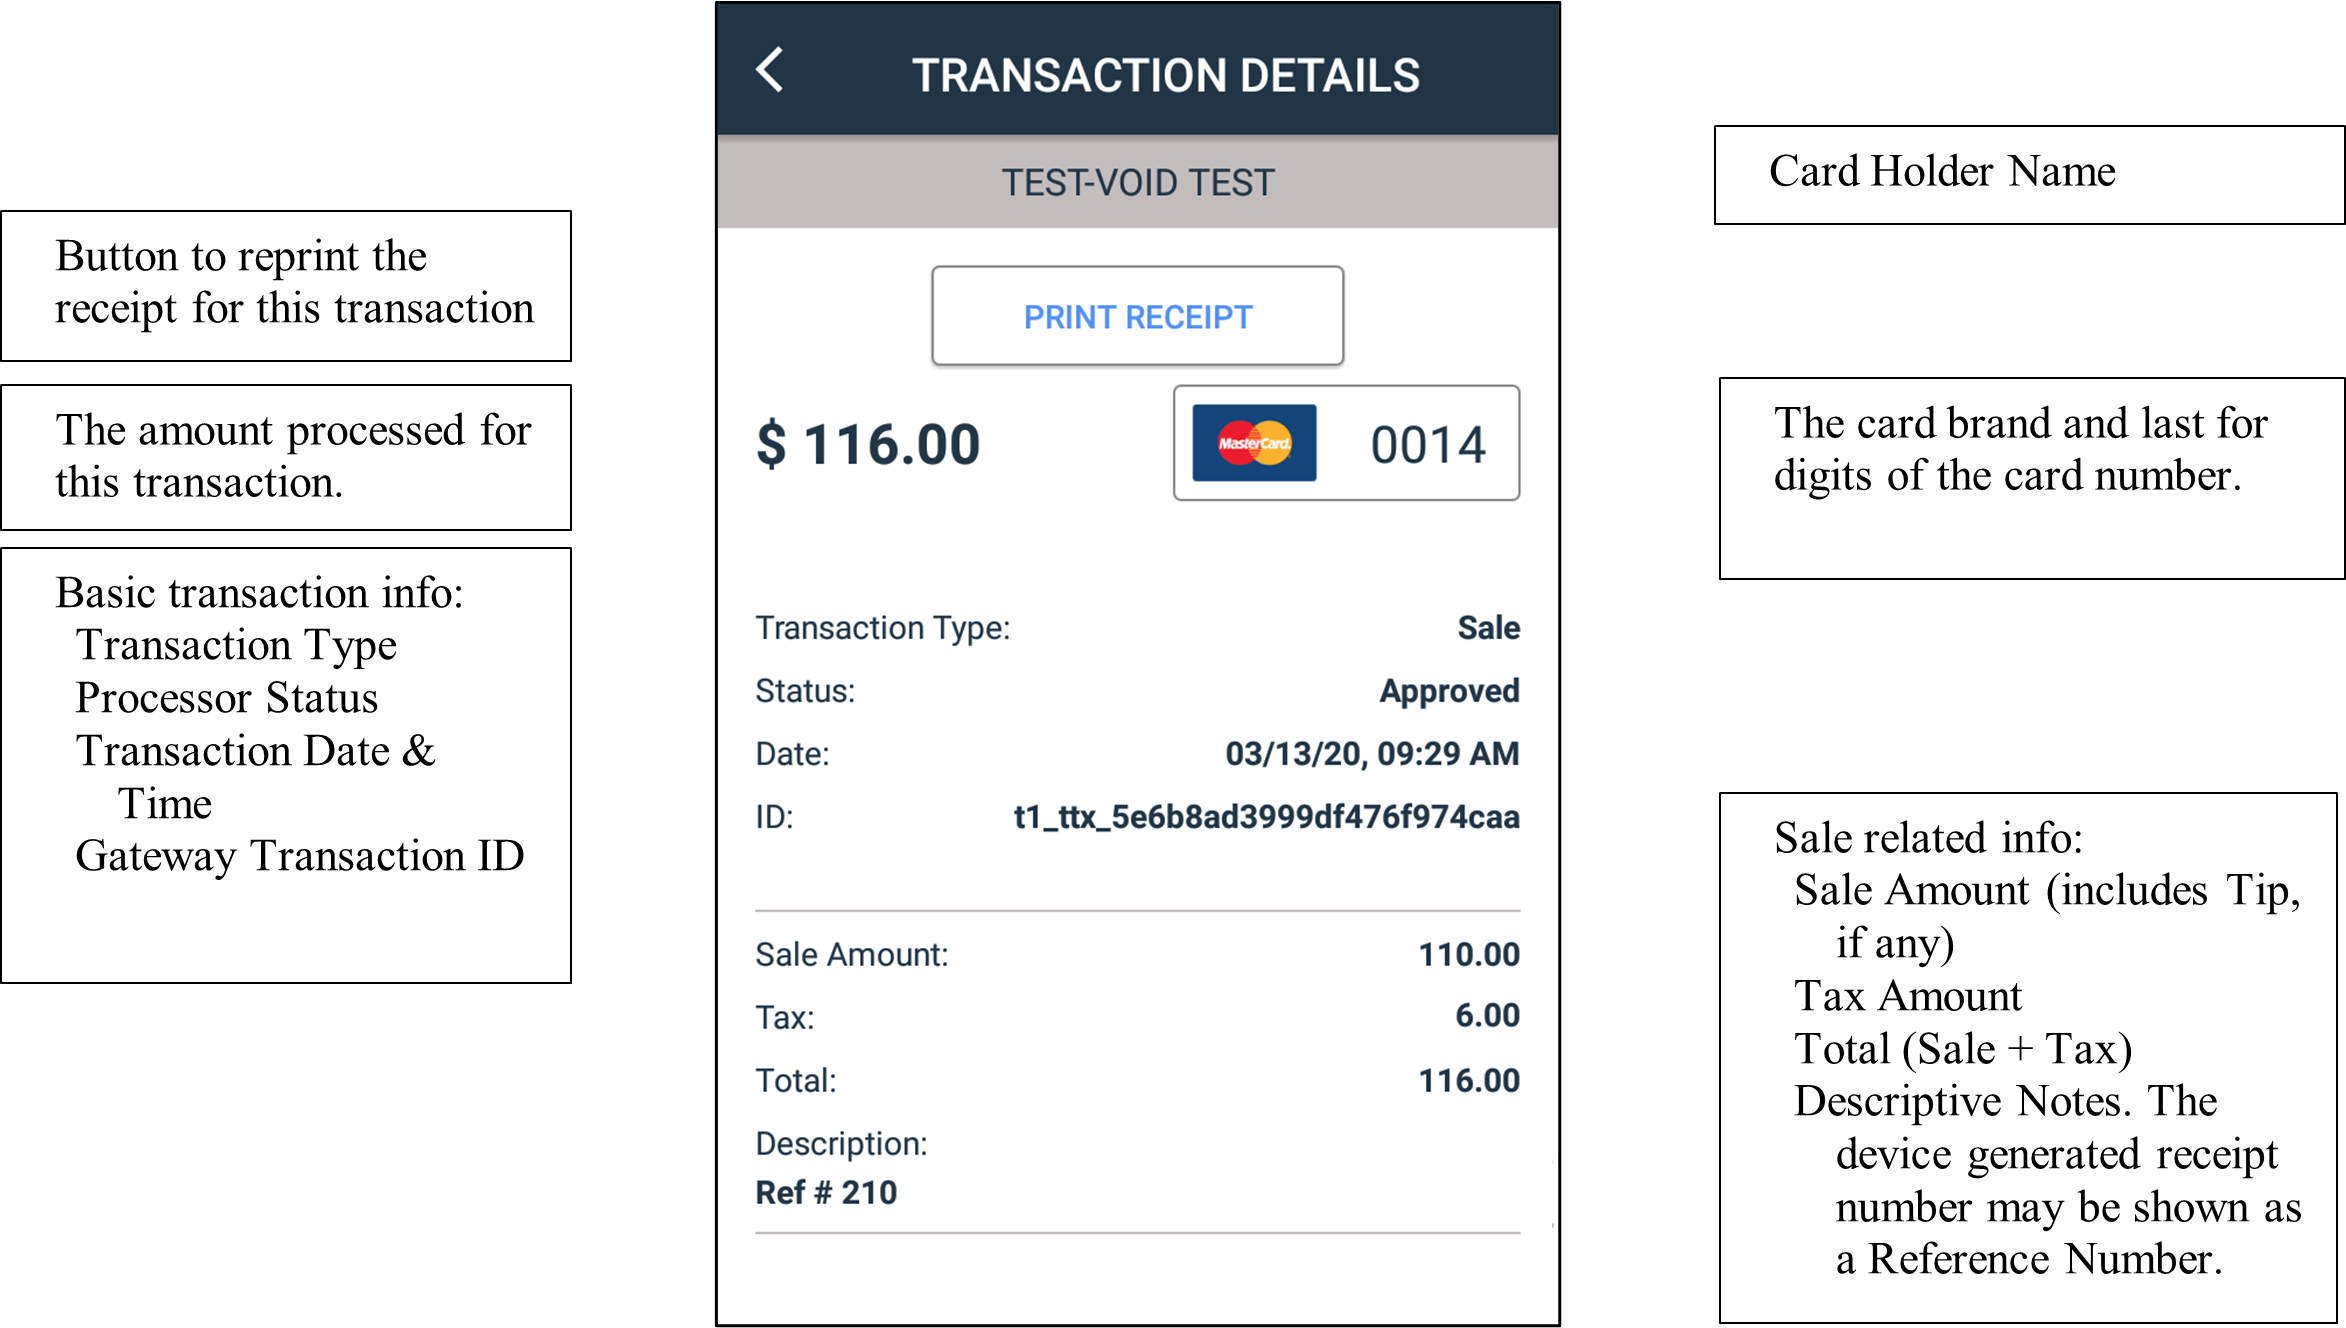
For transactions that have been processed by the Payrix gateway service, additional information may be displayed such as Refunds and other actions on the original transaction.
In addition, if the transaction is refund-eligible, a Refund button will be displayed at the bottom of the screen as shown in the following example where Refund Approval is enabled.
History Details – with Refund Approval Enabled
The Payrix app examines several criteria to determine if a transaction is refund-eligible. If the criteria are met then a “Refund Transaction” button will appear on the History Details screen.
Once the refund button is tapped, and if the Refund Authorization settings is engaged (see Settings), then the user will be prompted for an Approval Password.
Once the password is entered the refund processing will proceed.
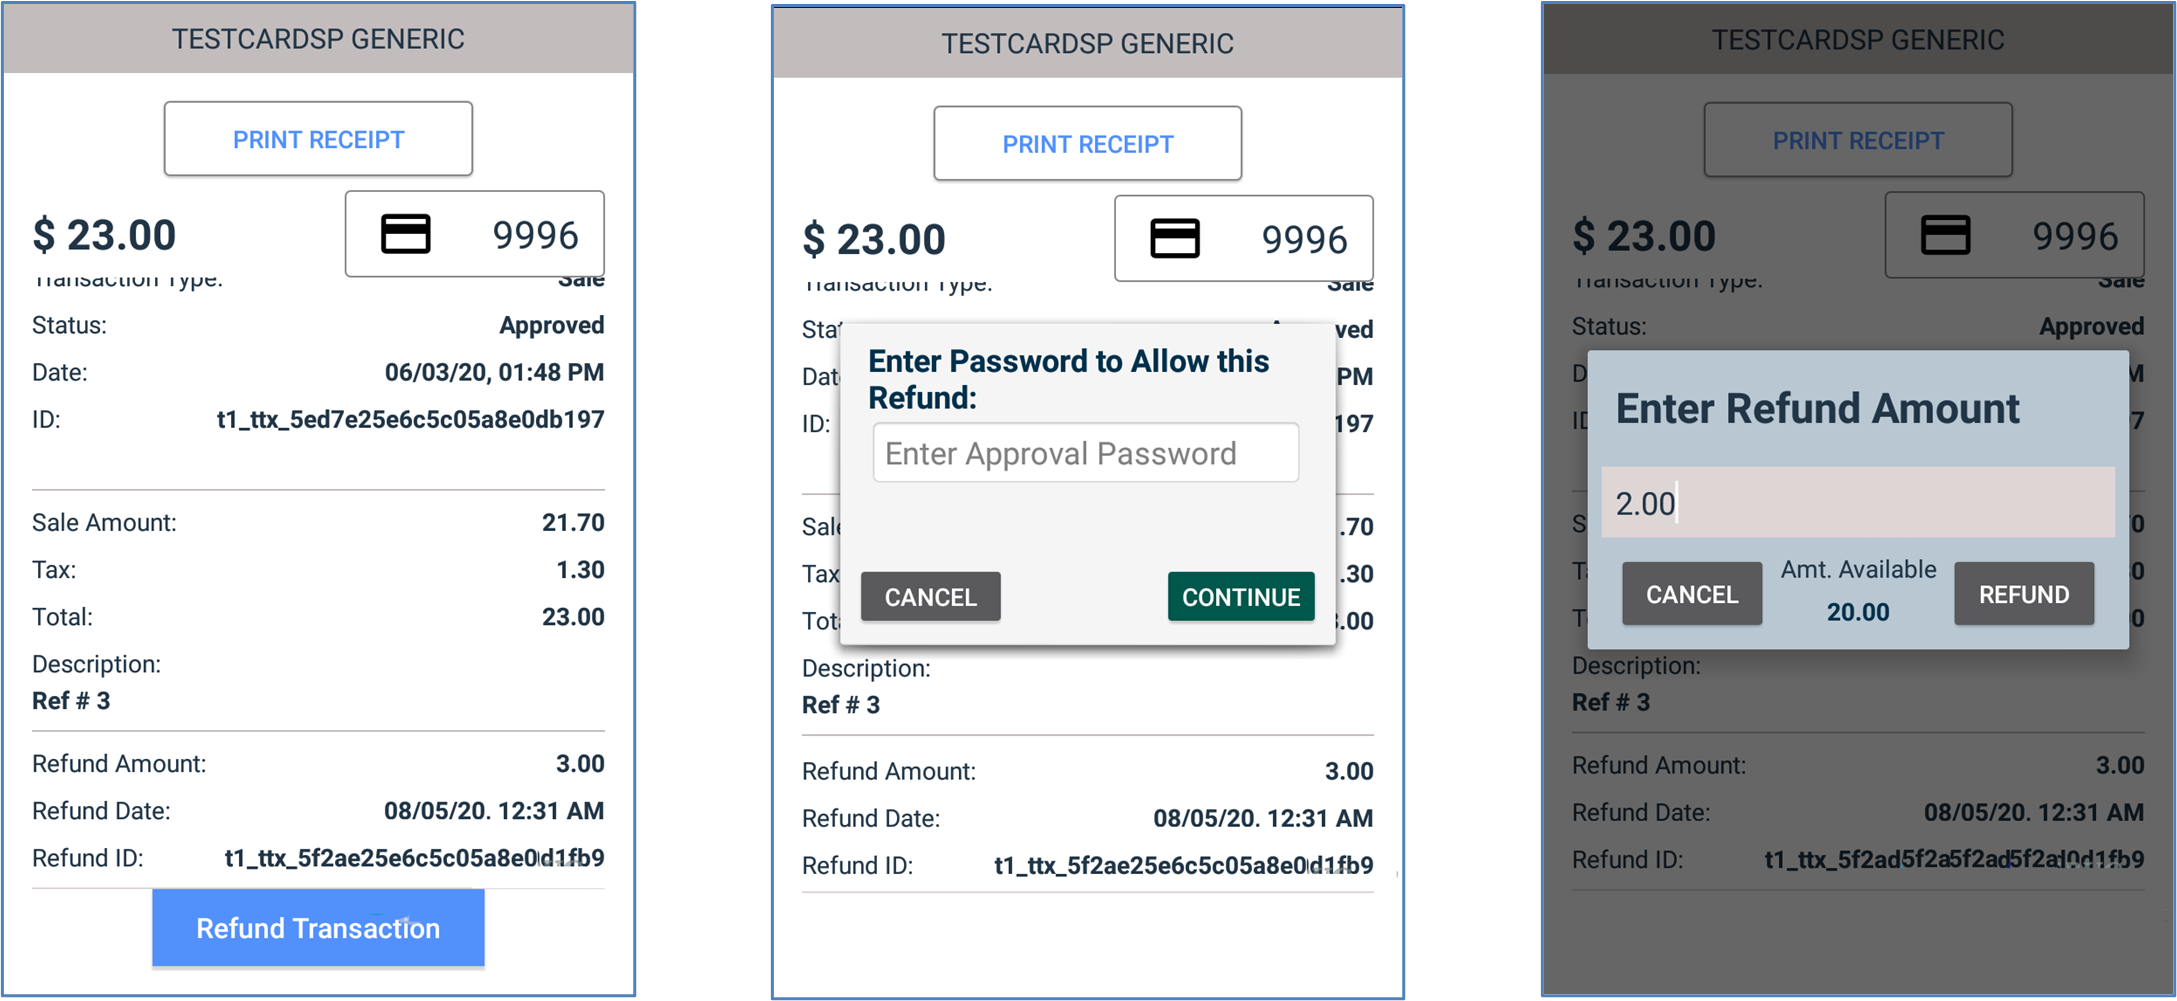
Note: This sample transaction had a previous partial refund for $3.00, which shows at the bottom of the history details. Also on the last screen on the right, the Amount Available for refund is only $20.00 because of the previously refunded $3.00.
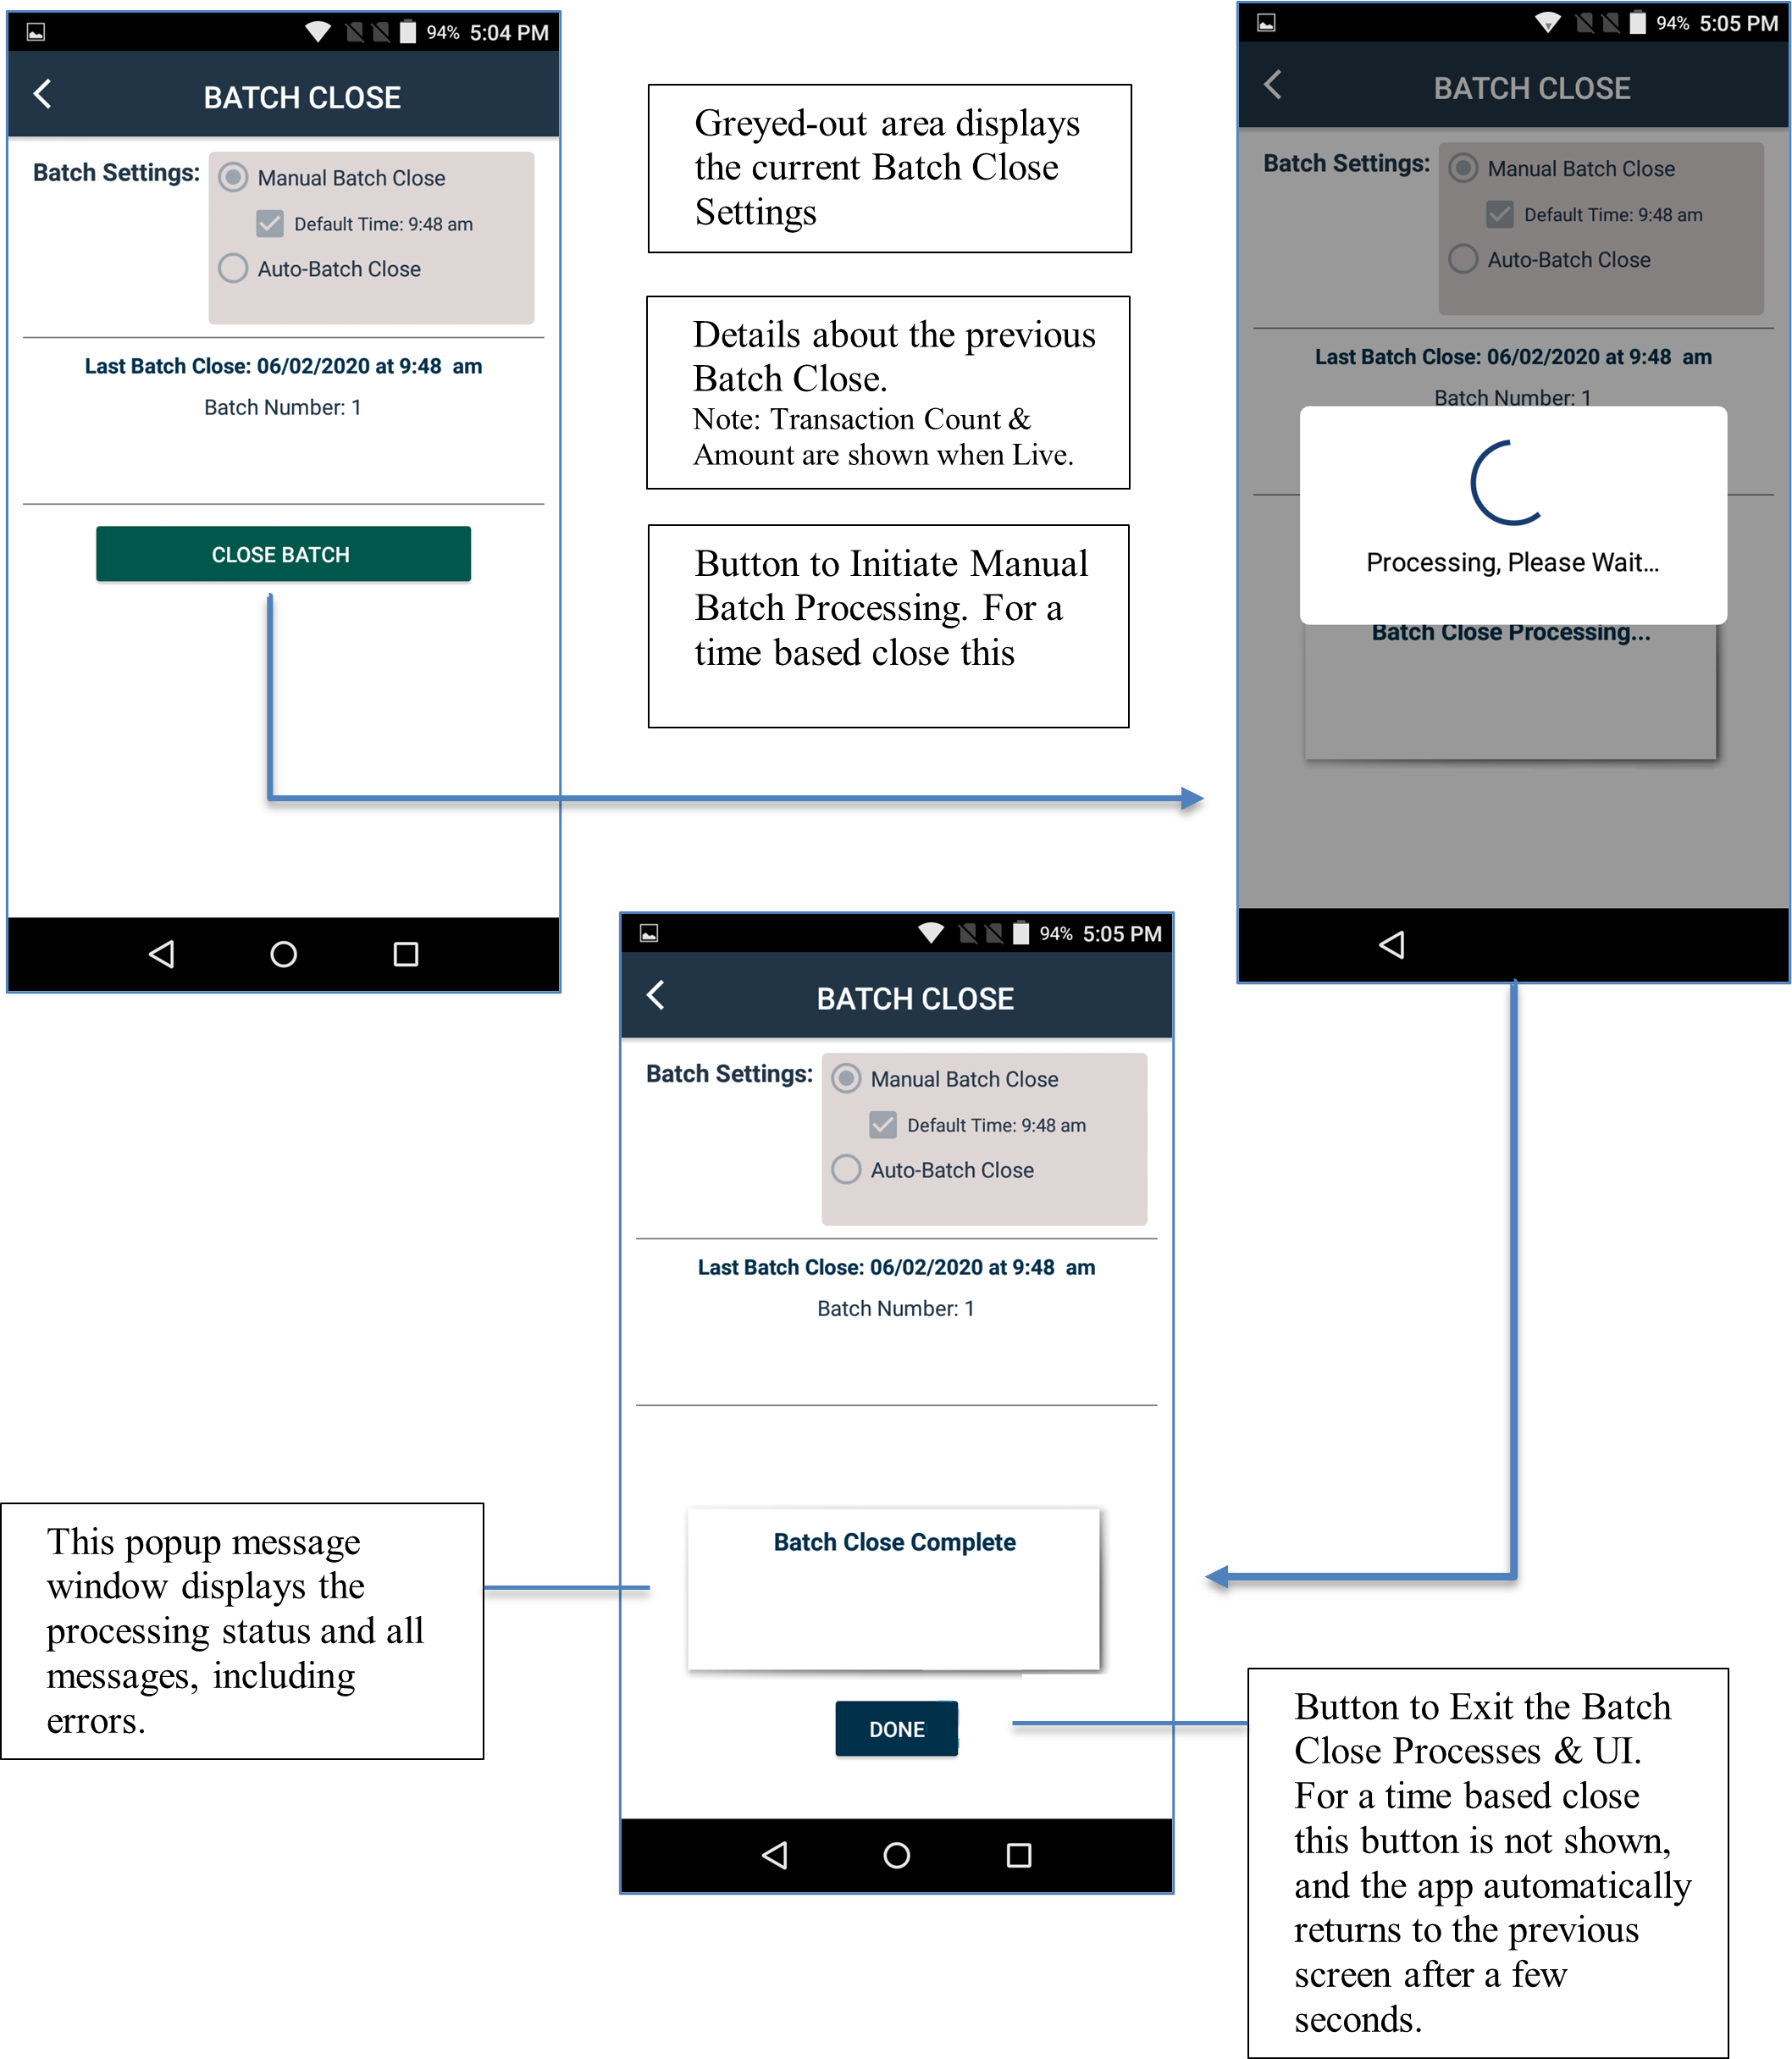
Batch
The Batch Close Out (Batch-Out) process provides the merchant the ability to close the transaction accounting for a particular day. This also commits those transactions for full processing by the processor.
The following screenshots show various stages of the Close process.
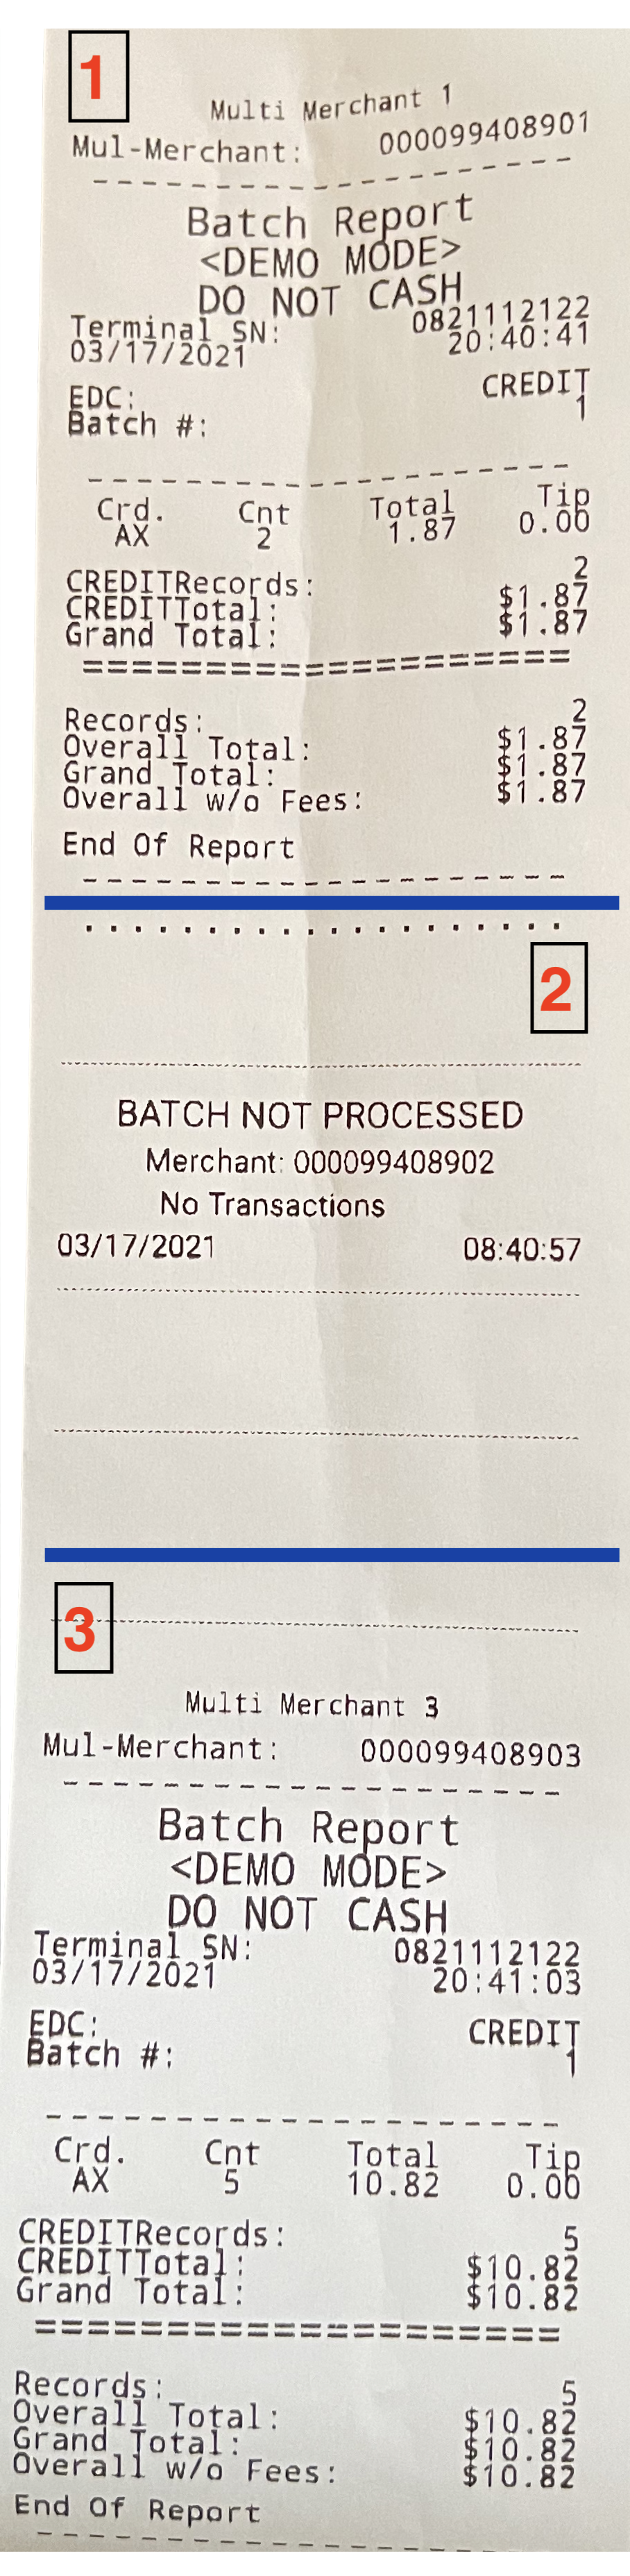
Batch Close with Multi-Merchant New
The new Multi-Merchant support also introduces a new Multi-Merchant Batch Close Out Report that prints on the receipt printer. The App will cycle through all merchants identified on the device as part of the multi-merchant group and perform a batch close. The following is an example of a multi-merchant batch close-out report.
Settings
Merchant Settings
This settings function allows a user that has multiple merchant accounts to be able to dynamically switch a device to a different merchant account.

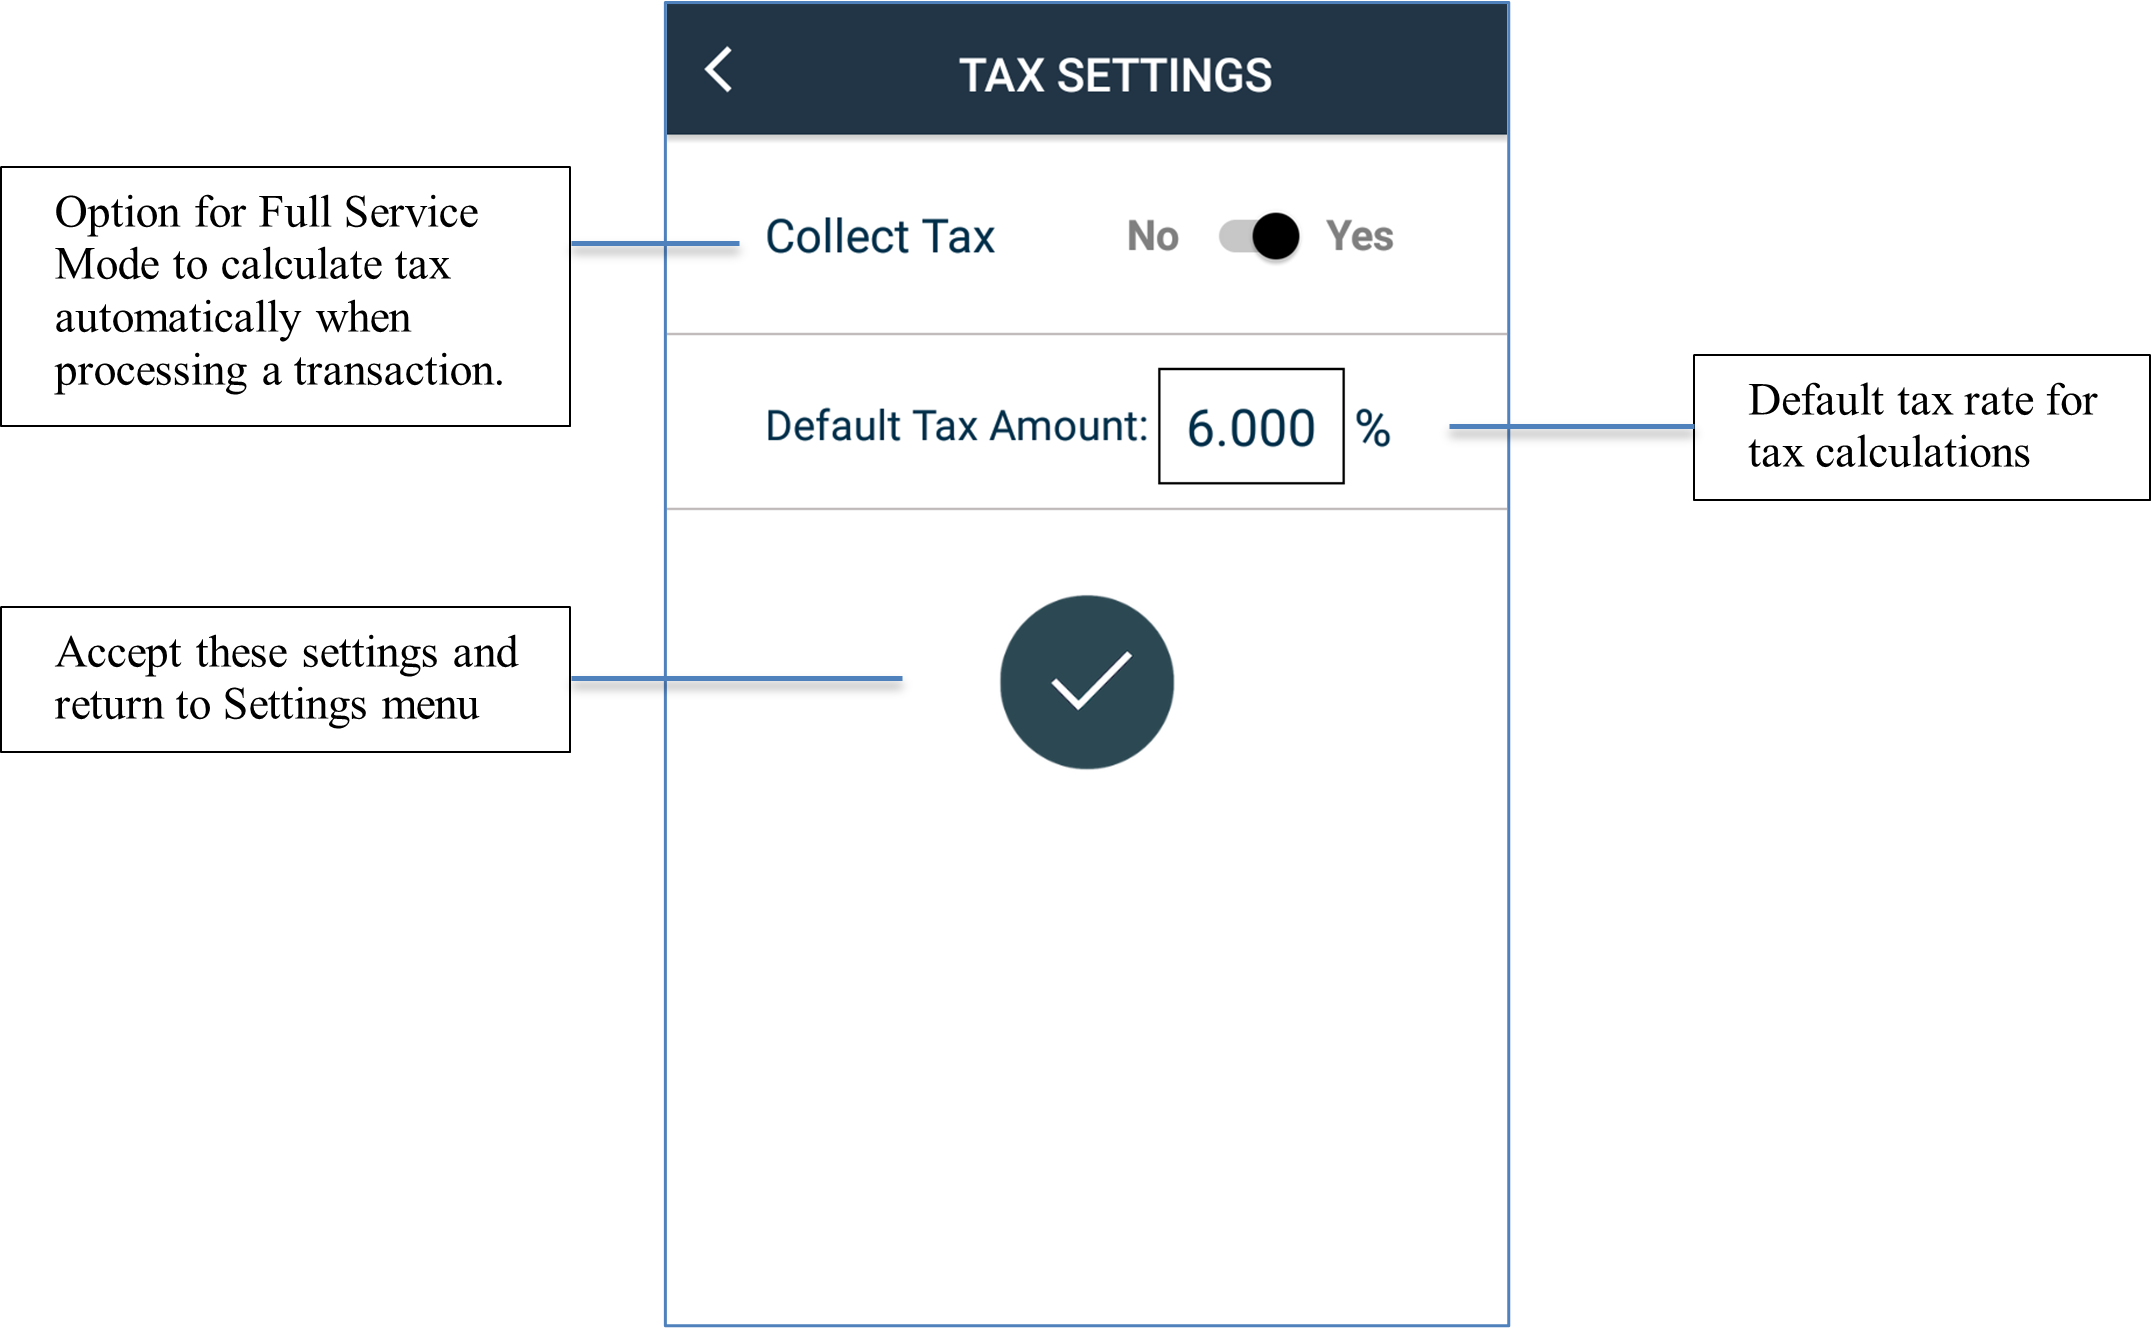
Taxes Settings
This settings function allows a user to enter a default tax rate as a percentage.
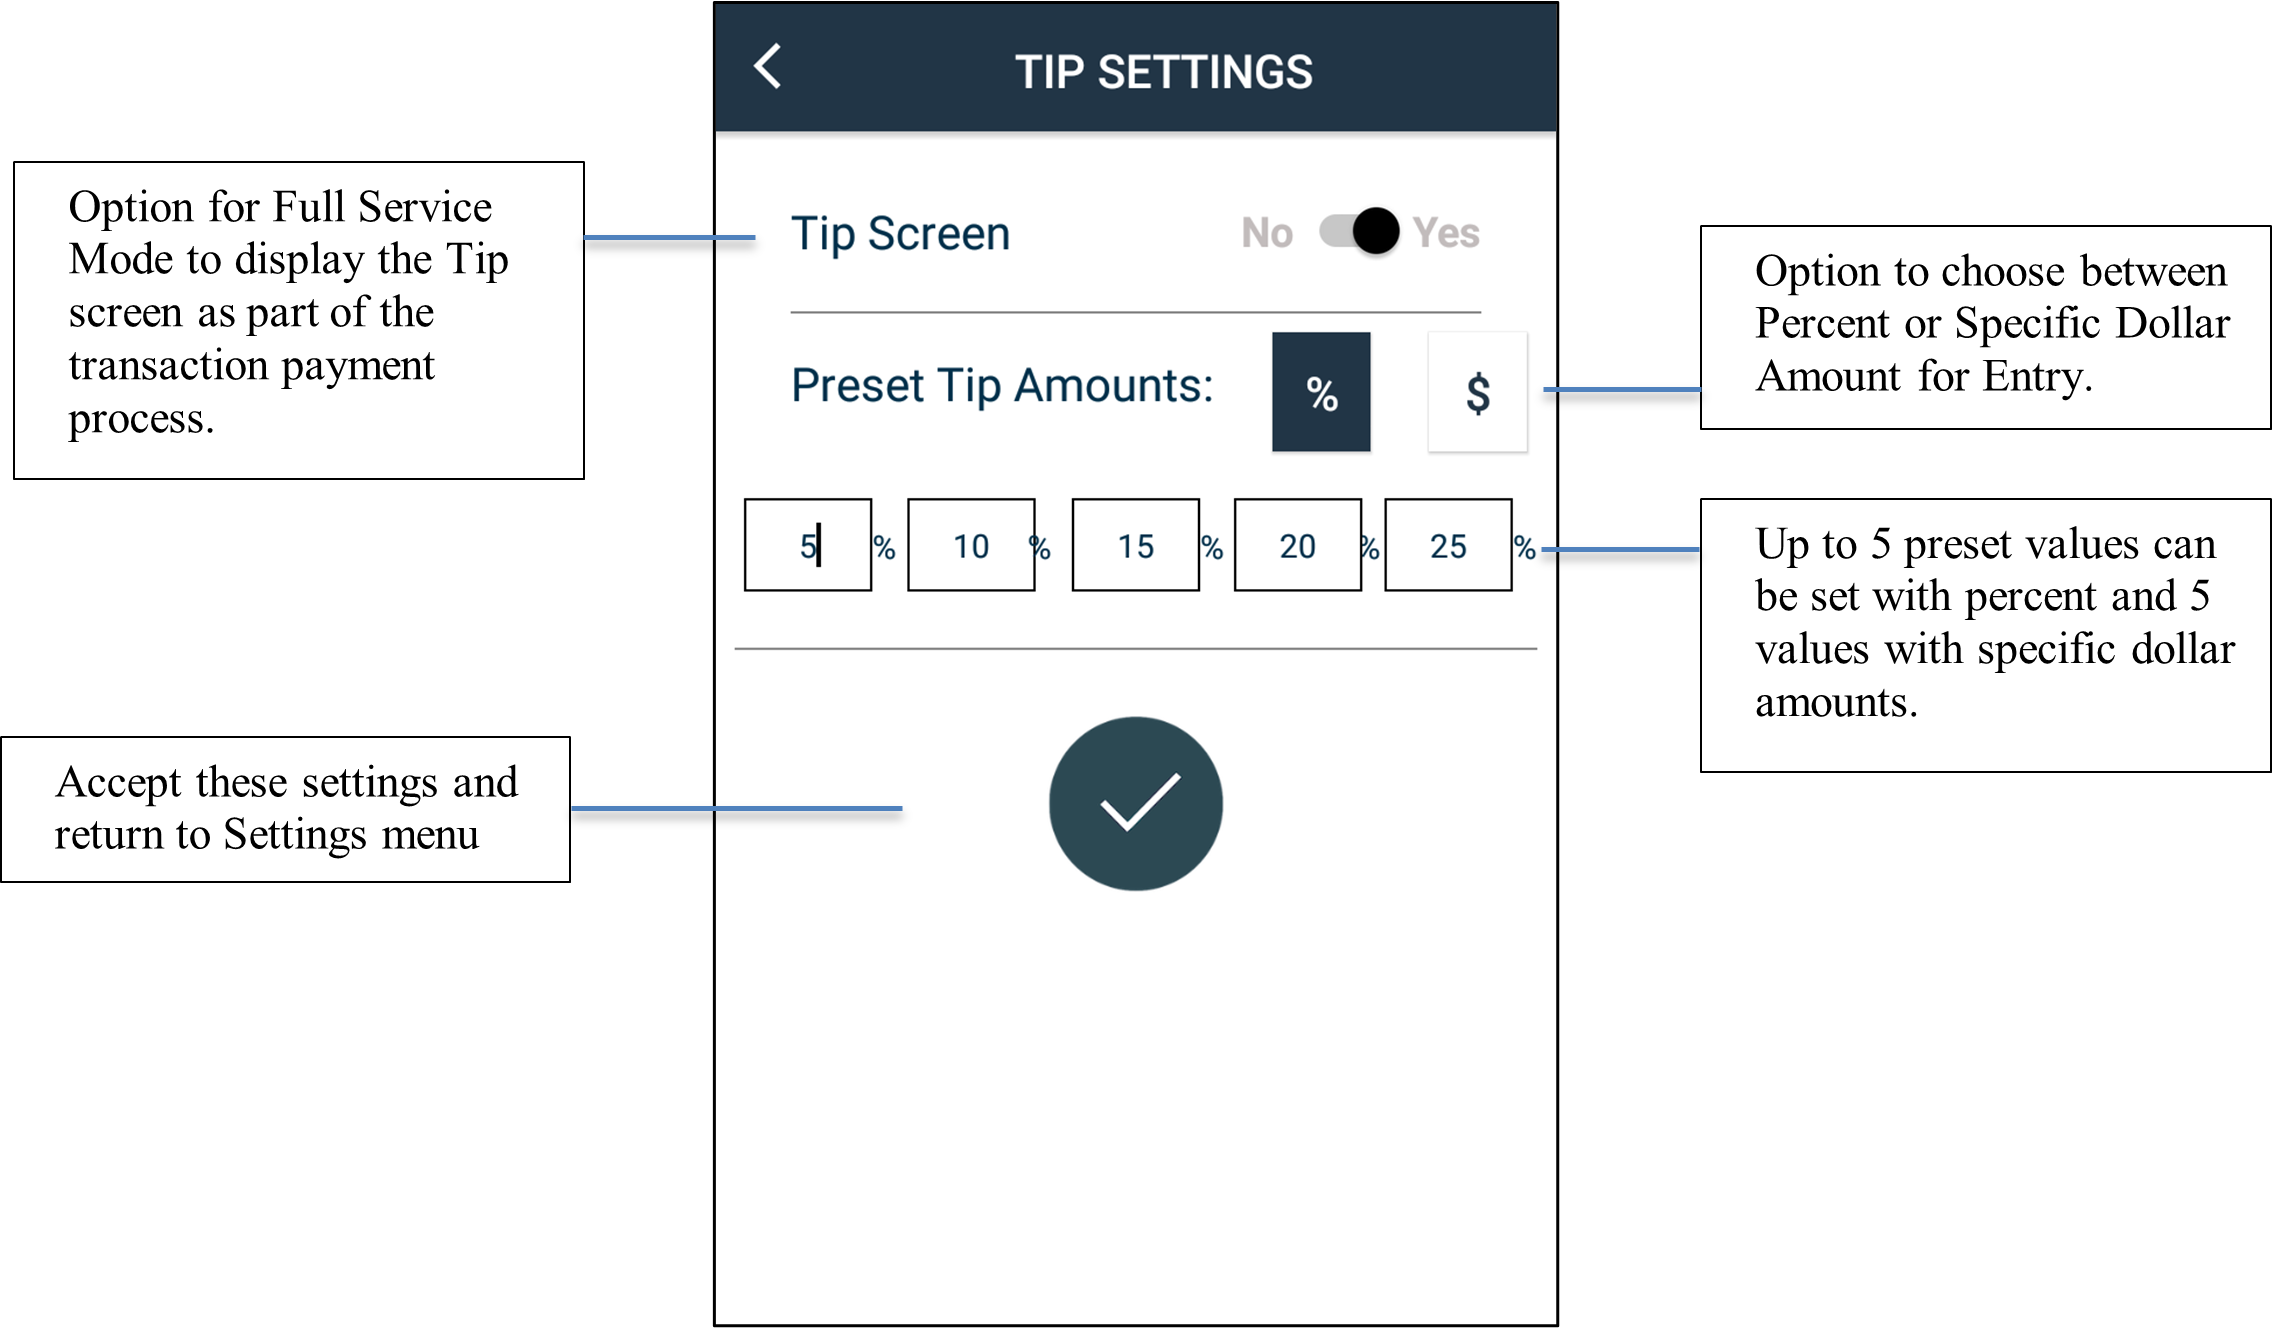
Tips Settings
This settings function allows a user to enter preset tip amounts, which expedites the tipping process, while suggesting tip amounts.
Terminal Mode Settings
This settings function allows a user to control and lock an A-Series device into “Terminal Mode”. This means that the device will only process transactions sent to it from a POS workstation, such as an electronic cash register (ECR).
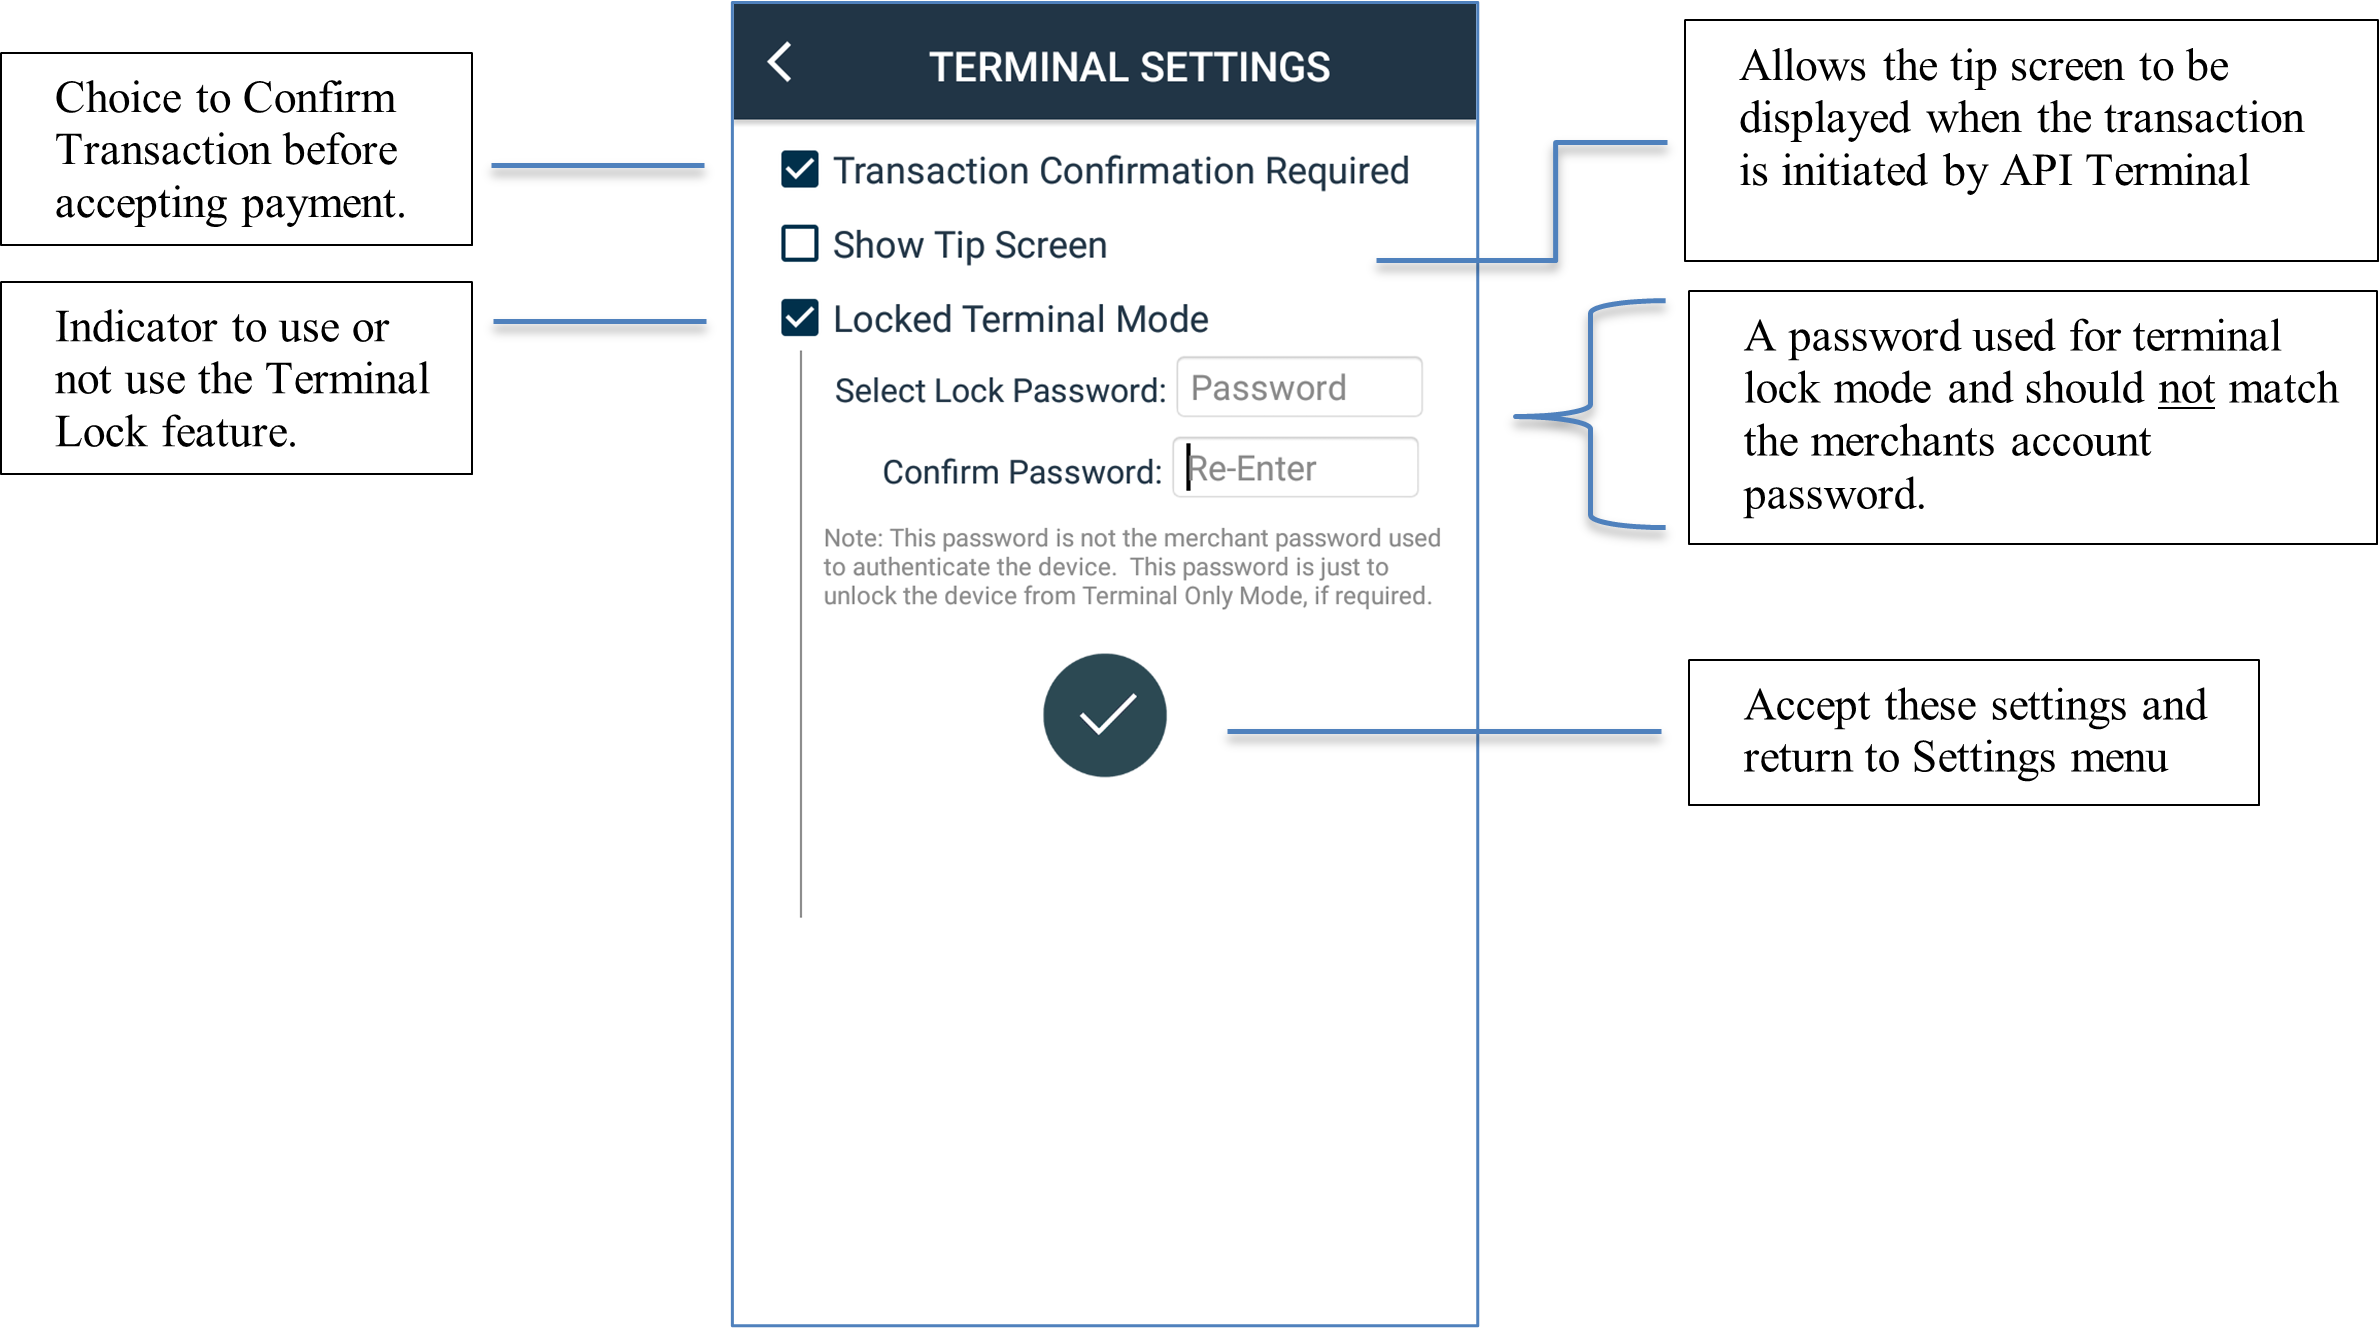
Once the Terminal Lock is engaged and the user enters Terminal Mode, the lock cannot be disengaged without entering the correct password and returning to this screen to turn off lock mode, or by re-authenticating the device which requires the merchant’s credentials.
The user is allowed 3 attempts to successfully enter the terminal lock password. If the password is forgotten, the merchant can reset the password by Re-Authenticating the device, which requires the merchant’s credentials.
Refund Authorization
This settings function allows a user to establish a Refund Approval password. This means that when a refund is requested, that before the refund is processed, the app will require the entry of an approval password.
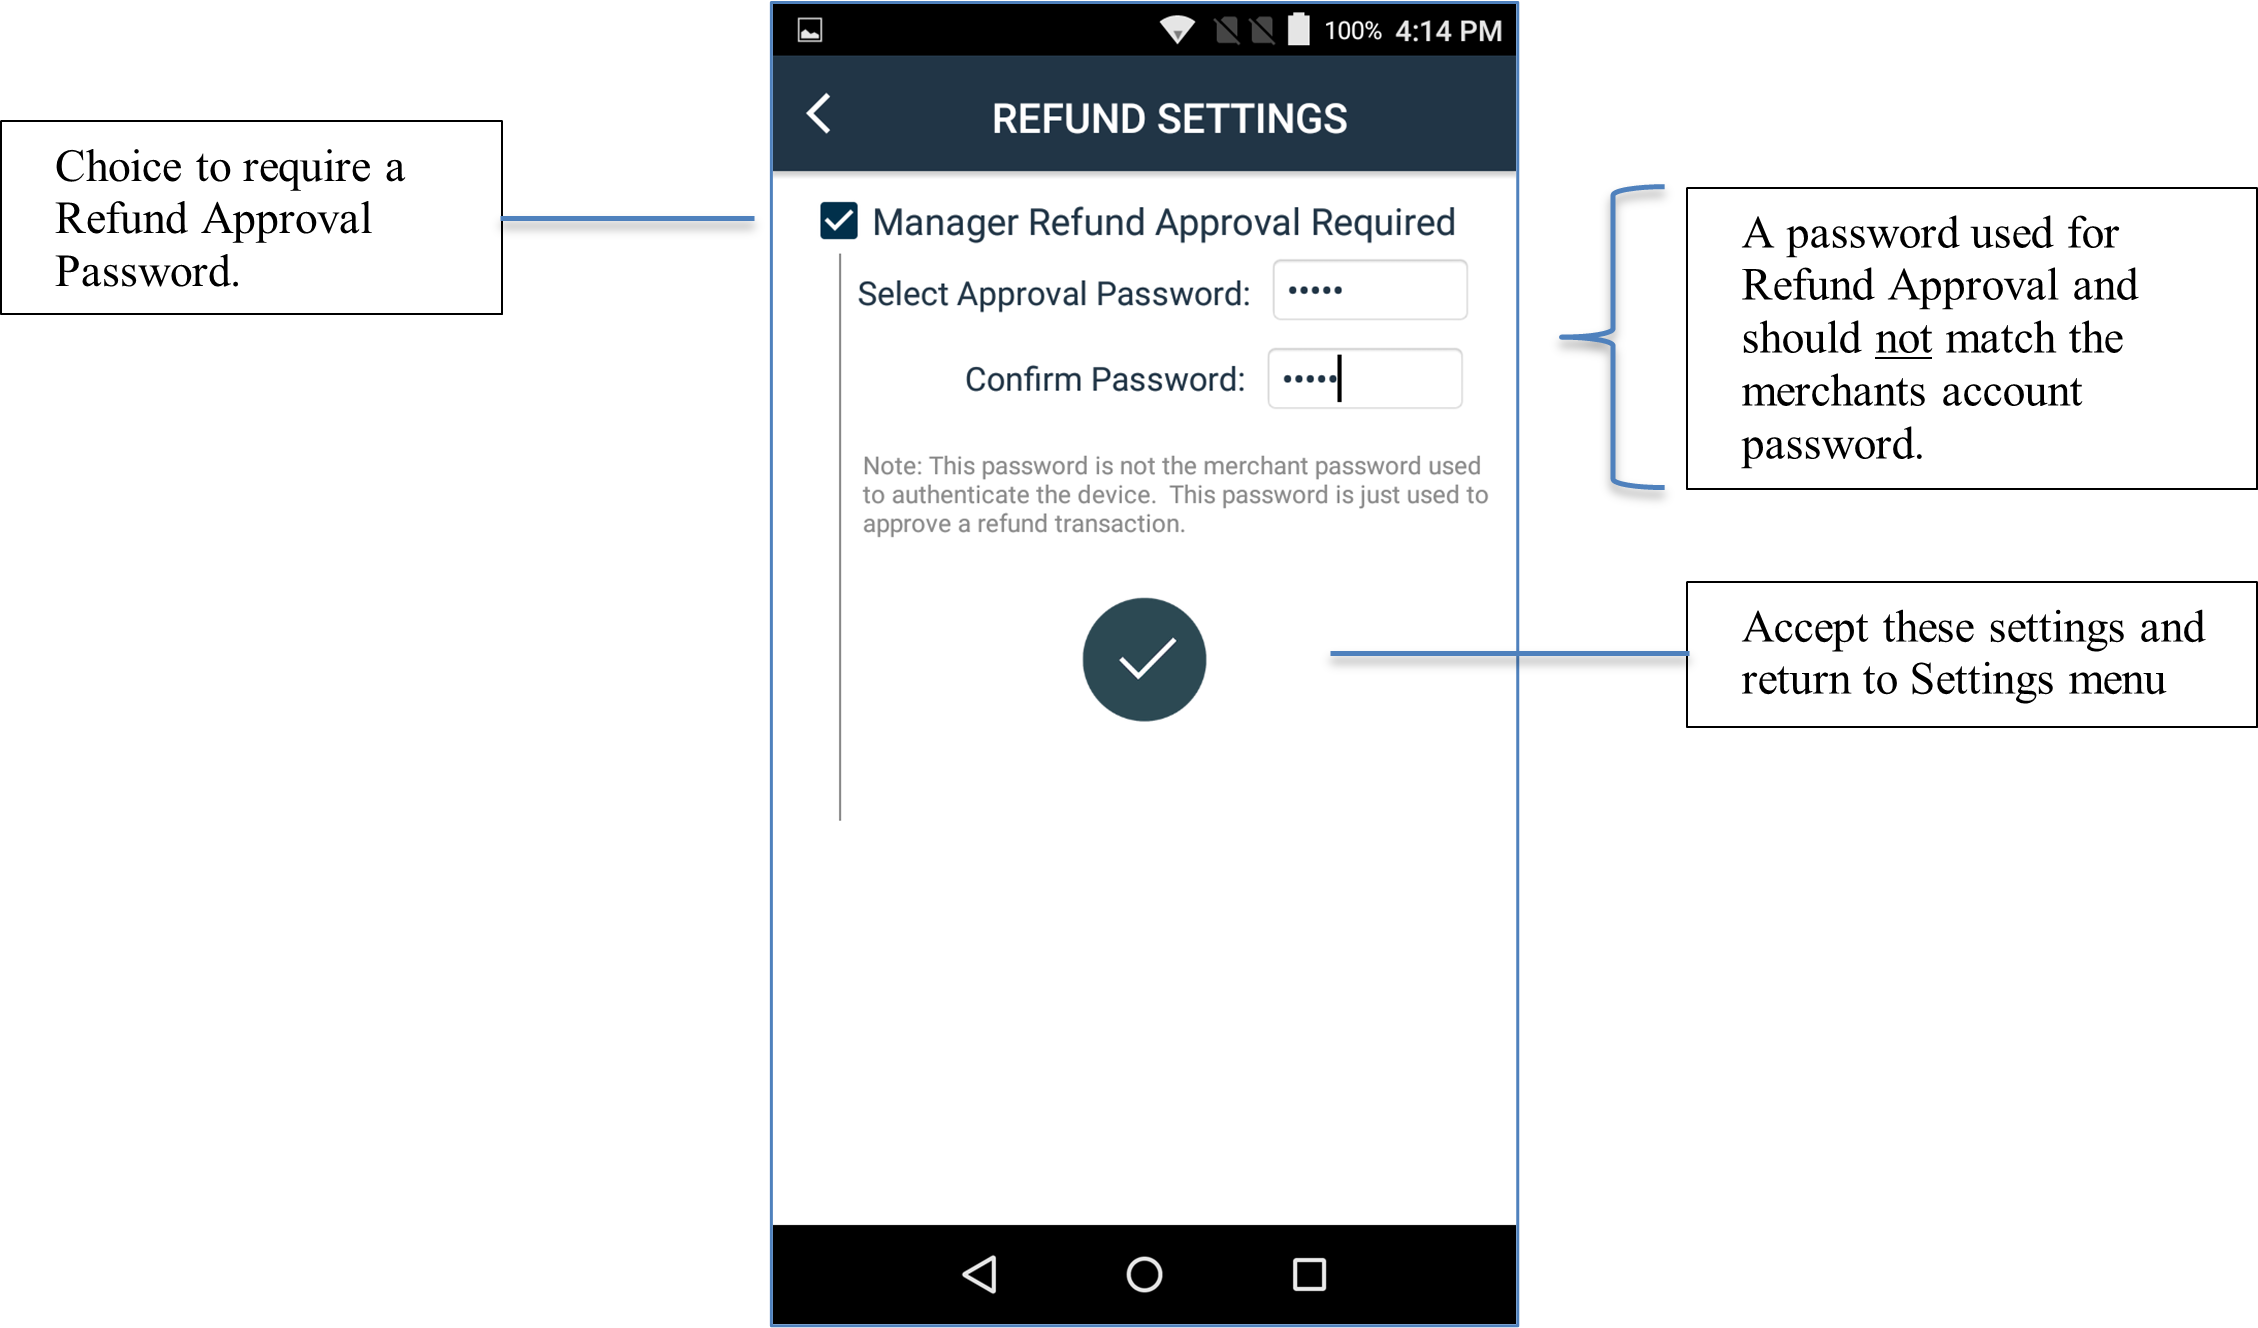
Once the Refund Approval is engaged, any refund request will require this password be entered to be processed.
The user is allowed 3 attempts to successfully enter the approval password. If the password is forgotten the merchant can reset the password by Re-Authenticating the device, which requires the merchant’s credentials.
After an approval password is engaged, any subsequent revisions to the Refund Authorization settings will require the user to enter the previously set approval password in order to continue with the revision.
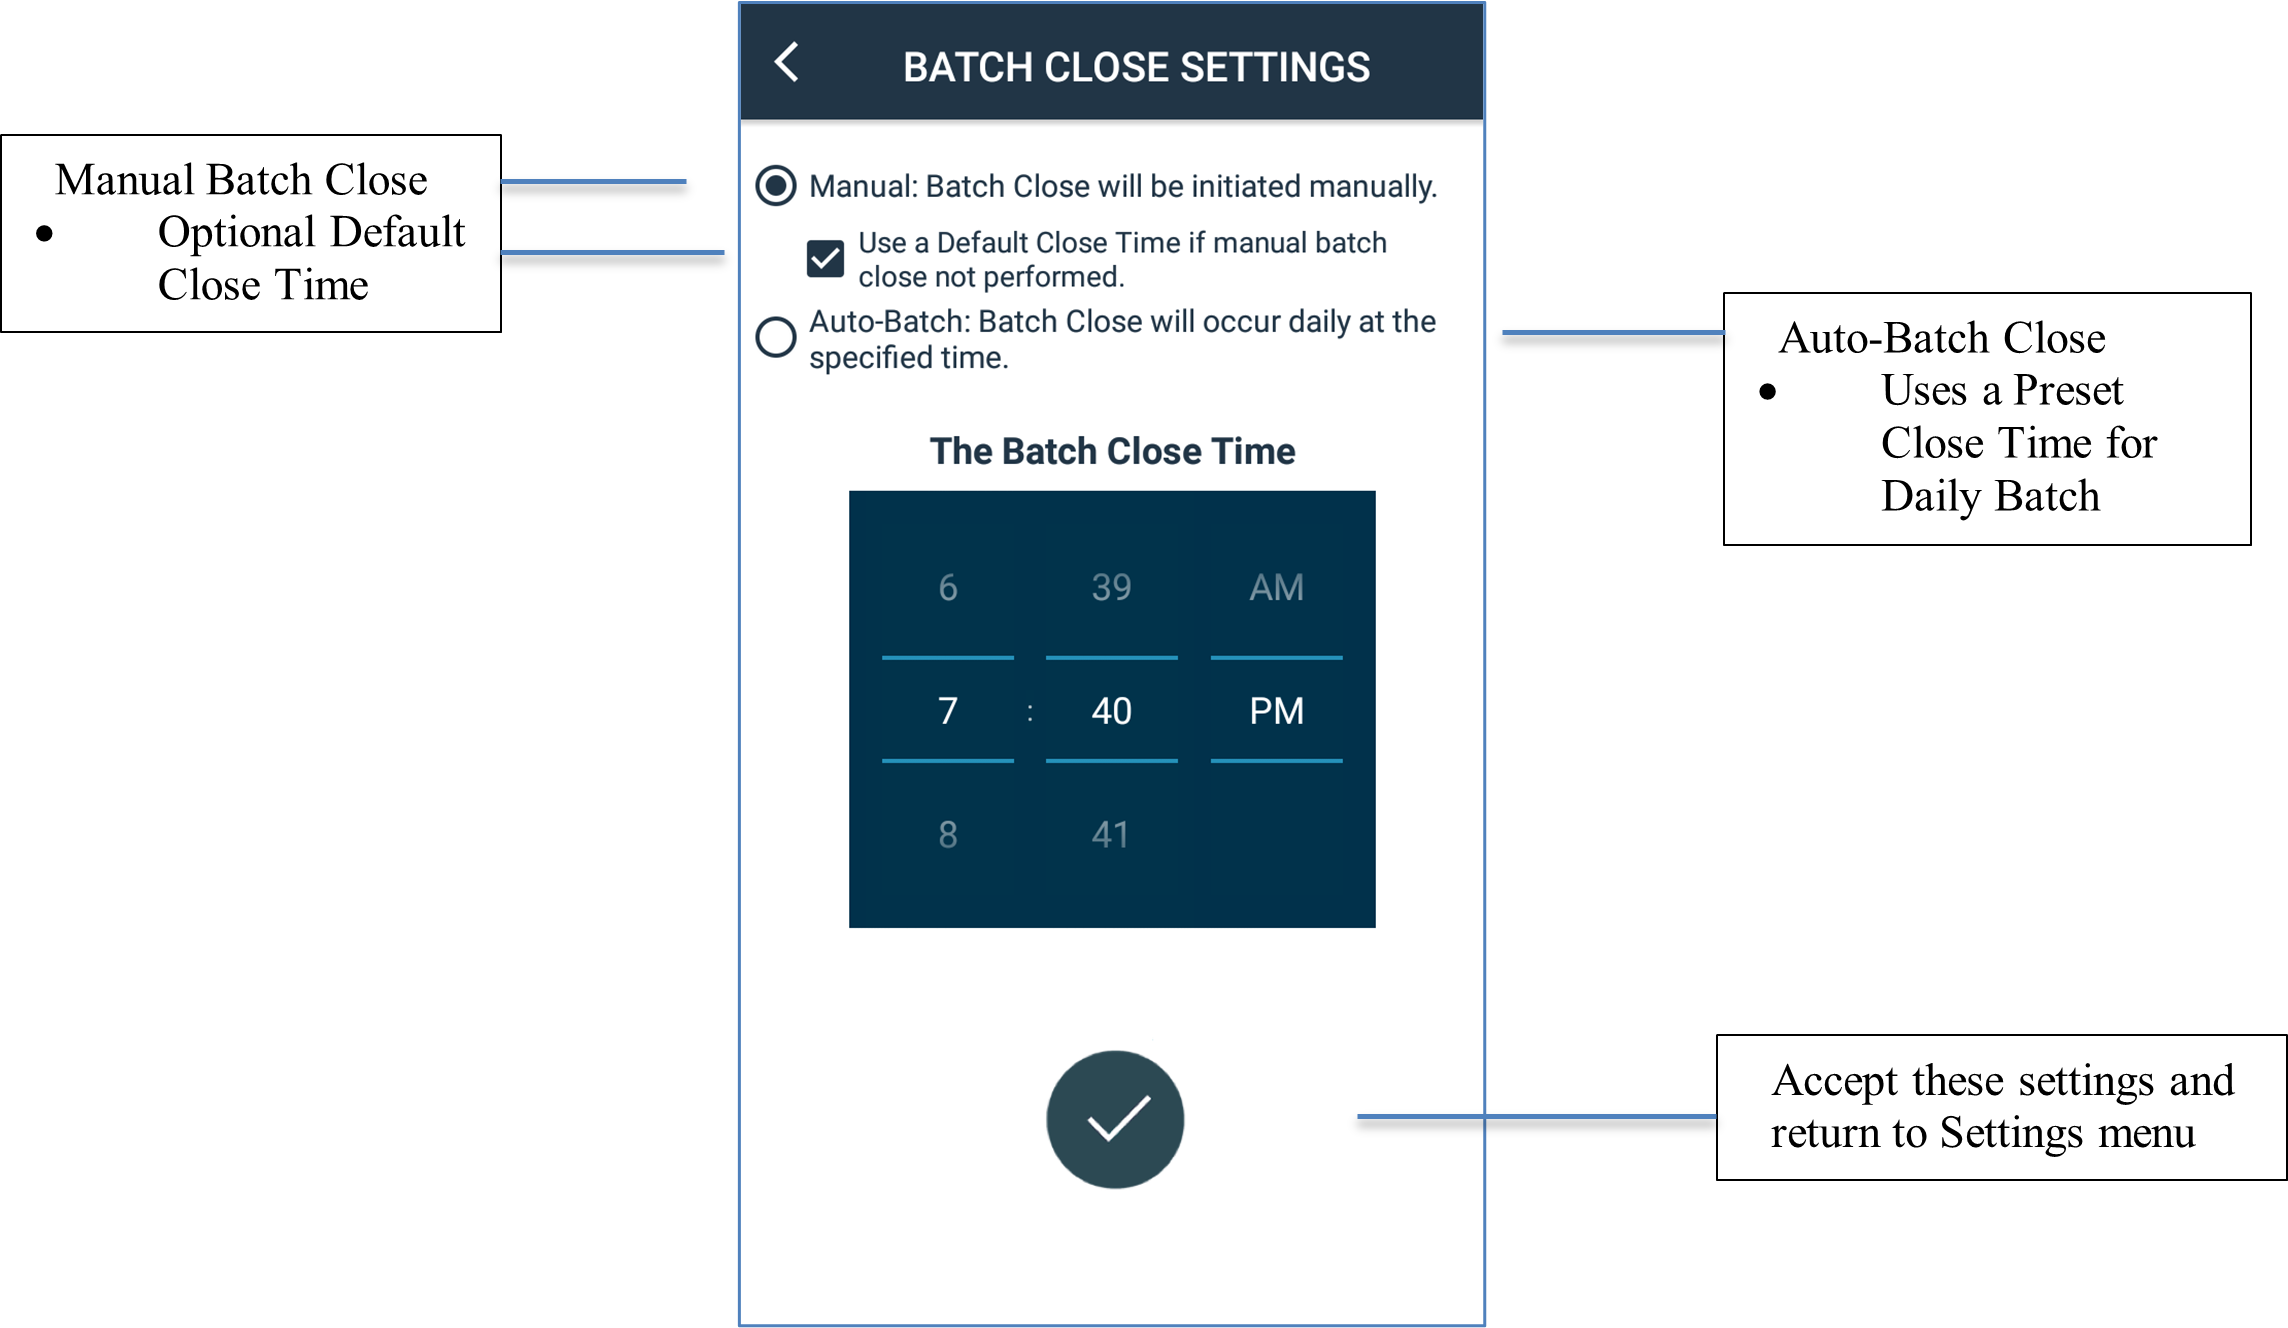
Batch Settings
This settings function allows a user to control how a Batch is to be Closed (Manually or Automatic), and if required when a close will occur. There are three close options:
Manual Batch Close
Manual Batch Close with a Default Close Time. The default close time is only engaged if the user forgets or is unable to perform a Manual Batch Close.
Auto-Batch Close with a Preset Close Time. The batch close is automatically engaged daily at the preset close time.
Guide Feature Improvement Additions History
Revision Date | Revision Description |
06.02.2020 | History UI. New Optional Terminal Activation Confirmations New Batch Close feature |
06.03.2020 | Failed Payment to include enhancement that offers Reattempting Charges. |
08.10.2020 | Settings and History Details sections, and new Refund Approval feature. |
10.13.2020 | Merchant Settings for Level II Data. New Level II Data to Full-Service Transaction Process |
03.19.2021 | Release of the Payrix App for PAX Version 2.0:
|