Skip table of contents

Google Pay Registration

Google Pay is a fast, easy, and secure way to pay that’s used by over 150 million users worldwide. Google Pay replaces the need for your customers to take a physical card or type in personal information during the sales process.

Google Pay functionality is built into our existing platform and requires little-to-no development work, with two easy integration options:

These options include everything you need to directly implement the Google Pay solution into a checkout flow for a fully customizable customer experience. 

Note: Cardholders must set up their Google Pay mobile wallet to use Google Pay. See Google’s recommended steps to set up a Google Pay mobile wallet.

Compatible browsers and devices

Google Pay is compatible with the latest versions of the following browsers:

  • Google Chrome

  • Mozilla Firefox

  • Apple Safari

  • Microsoft Edge

  • Opera

  • UCWeb UC Browser

The Google Pay mobile wallet also has the following minimum Android device requirements:

  • Android 7.0 (Nougat) or higher.

  • Near Field Communication (NFC) support.

  • Host Card Emulation (HCE) support.

Note: Cardholders must add a credit or debit card payment method to their Google Pay mobile wallet before being able to use Google Pay. See Google’s recommended steps to add a debit or credit card to a Google Pay mobile wallet.  

Note: Google Pay must be enabled in a customer’s browser to access their mobile wallet on your site for Google Pay.

Google Pay Registration

To accept Google Pay you must complete the registration process.

You can enable your Merchants to accept Google Pay by simply going into the Portal and visiting the Settings page.

To complete Google Pay registration, follow the steps below:

Click here to see all Google Pay Registration steps.

Step 1: Navigate to Settings from the main Dashboard, under the Admin category. Then, click Payment Methods.

Step 2: On the Payment Methods page, click the GOOGLE PAY - REGISTER ALL button under the Google Pay section.

Step 3: In the “Are you sure you want to register all merchants of this division with Google Pay” lightbox, click YES and OK to complete the registration.


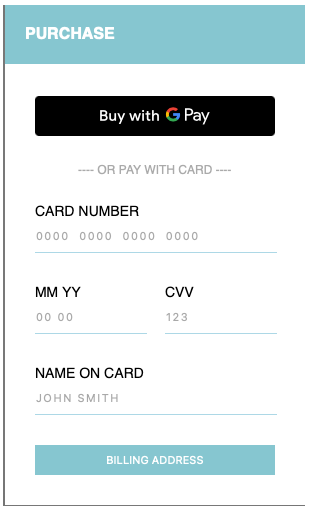
Setup PayFrames for Google Pay

Enabling Google Pay will automatically display within the PayFrame with very little integration work. After the initial Google enablement process is completed, add the JavaScript snippet below to your site package:

HTML
<script src="https://pay.google.com/gp/p/js/pay.js"></script>

This will display the Google Pay button in your Payframe, allowing cardholders to select Google Pay as a payment option. 

For additional guidance, set up your PayFrame inside the sandbox view so you can preview how to embed the button inside the frame. 

To test, use this code snippet to create a test PayFrame:

Click here to see the test PayFrame JavaScript code for HTML.

Example PayFrame Script Code Example

HTML
<script type="text/javascript" src="https://test-api.{domain}.com/payFrameScript"></script> 
<script> 
 PayFrame.config.apiKey = "5e4ff3fc24164731f64541d0e429ec56"; 
 PayFrame.config.merchant = "t1_mer_607d0c408cded2c12874f12"; 
 PayFrame.config.hideBillingAddress = false; 
 PayFrame.config.amount = 100; 
 PayFrame.config.color = "c351e8"; 
 PayFrame.config.mode = "txn"; 
 PayFrame.config.txnType = 'sale';
</script>

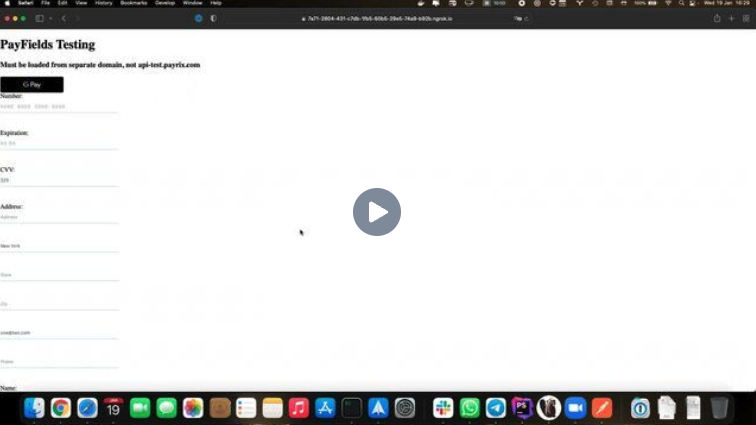
Setup PayFields for Google Pay

For clients using PayFields, there is a simple and easy solution to add the Google Pay payment option to your existing checkout flow.

PayFields will allow your customers to select to input their card information or utilize Google Pay at the point of sale. 

Click here for PayFields Google Pay setup steps.

Step 1: Register for Google Pay using the Google Pay Registration steps above.

Step 2: Create a new PayField.

Step 3: Add the Google Pay JavaScript within the <header> tag.:

JS
  <script src="https://pay.google.com/gp/p/js/pay.js"></script>

Step 4: Add the following Google Pay button <div> inside the <body> tag.

HTML
<div id="googlePayButton"></div>

Step 5: Add the following required PayFields JavaScript (and any additional customizations):

HTML
<script>
const initPayFields = () => {
        if (PayFields) {
            PayFields.config.apiKey = '<APIKEY here>';
            PayFields.config.merchant = '<merchant ID here >';
            PayFields.config.amount = 1;
            PayFields.config.txnType = 'sale';
</script>

Step 6: (Optional) Add the following PayFields JavaScript to the code above to enable sandbox testing:

CODE
PayFields.config.googlePay.environment = 'TEST';

Step 7: (Optional) Add custom stylization to the Google Pay button look & feel (example):

HTML
<script>
const googlePayButton = document.getElementById('container');
const button = googlePayClient.createButton({
  buttonColor: 'default',
  buttonType: 'plain',
  onClick: () => {},
  allowedPaymentMethods: []
container.appendChild(button);
</script>

Google Pay - Example PayField with Google Pay.
HTML
<!DOCTYPE html>
<html>
<head>
  <meta charset="utf-8">
  <!-- PayFields Domain. Uses different naming conventions for sandbox and production-->
  <script type="text/javascript" src="https://test-api.payrix.com/payFieldsScript"></script>
  <!-- Include the Google Pay Script -->
  <script src="https://pay.google.com/gp/p/js/pay.js"></script>
  <!-- jQuery for added PayField functionality -->
  <script>
    src="https://code.jquery.com/jquery-3.6.3.min.js"
    integrity="sha256-pvPw+upLPUjgMXY0G+8O0xUf+/Im1MZjXxxgOcBQBXU="
    crossorigin="anonymous">
  </script>
  <title>PayField Testing</title>
</head>
<body>
  <!-- Google Pay Div -->
  <div id="googlePayButton"></div>
  <hr>
  <div id="name"></div>
  <div id="address"></div>
  <div id="ccnumber"></div>
  <div id="ccexp"></div>
  <div id="cvv"></div>
  <script>
    const initPayFields = () => {
      if (PayFields) {
        PayFields.config.apiKey = '<APIKEY here>'; // Required.
        PayFields.config.merchant = '<Merchant ID here >'; // Required.
        PayFields.config.amount = 1; // Required.
        PayFields.config.txnType = 'sale'; // Required.
        PayFields.config.googlePay.environment = 'TEST'; // Sandbox. Comment line out for Production.  
        PayFields.fields = [
          {
            type: 'number',
            element: '#ccnumber'
          },
          {
            type: 'cvv',
            element: '#cvv'
          },
          {
            type: 'expiration',
            element: '#ccexp'
          },
          {
            type: 'name',
            element: '#name',
            values: { name: 'John Wayne' }
          },
          {
            type: 'address',
            element: '#address',
            values: {
              email: 'one@two.com',
              city: 'New York'
            }
          }
        ];
        PayFields.customizations = {
          placeholders: {
            '#expiration': '00/00',
            '#payment_cvv': '000',
            '#payment_number': '0000 0000 0000 0000'
          }
        };
        PayFields.onValidationFailure = () => {};
        PayFields.onFailure = (response) => {};
        PayFields.onSuccess = (response) => {
          console.log(response);
        };
      } else {
        throw Error('There is no PayFields property in the window object.');
      }
    }
    initPayFields() // Call function and execute all logic
  </script>
</body>
</html>

Additional Resources

Google Pay - Frequently Asked Questions

What is Google Pay™?

Google Pay is Google’s digital payment service located in the Google Pay app on your mobile device. It allows users to make contactless point-of-sale payments or web purchases after adding their debit/credit card.

What devices can I use with Google Pay?

A compatible Android™ device with KitKat 4.4 or higher. The Google Pay app is preloaded on select devices. You can download the app in the Google Play™ store.

Does Google Pay work online and in-store?

Yes. Google Pay will work as a contactless payment solution in-store using a Google Pay-enabled device, as well as in an eCommerce environment utilizing the Google Device verification and authentication feature.

Is Google Pay secure?

Google Pay is secure. When you make payments, Google Pay never uses your actual card number but rather uses a virtual account number so your card details and private information are safe. Google Pay keeps your payment information encrypted on secure servers, so your full details are never stored on your phone or shared with merchants when you buy something because they see your virtual account number instead. When you set up Google Pay, you will have to set a screen lock if you don’t already have one. We recommend making sure Google Device Manager is on, which you can use if your phone is lost or stolen.

How is my card information secured within Google Pay?

You have to unlock your phone by either entering your PIN code or your fingerprint to use Google Pay. Once you’ve added your card to Google Pay, a unique encrypted number is created, assigned, encrypted, and stored on your phone. The data is protected on multiple layers that include encryption technology and Transport Layer Security. When you use Google Pay, your unique encrypted card number is used instead of your actual debit card number, so your debit card number is then never seen by a merchant as it is when swiping your card. 

Do you charge any fees to use Google Pay?

There is no additional charge to offer or use Google Pa, but it does require an active data plan to work and your data plan may apply additional message and data charges.

Will it work on my iPhone or Safari browser?

Google Pay is compatible with Safari browsers but is not compatible with your iPhone. 

Where can I learn more about Google Pay? 

https://pay.google.com/about  

Google Pay - Error Codes and PayField Callback Responses

See a list of Google Pay error codes that could be returned from the Google Pay server by visiting the Google Pay API Error Objects Google Developer Documentation

PayField Response

Description

onSuccess


This callback function will execute only if the payment was successfully submitted.

Example: Use onSuccess to customize a customer message indicating that their payment was successfully processed.

onFailure

This callback function will execute only if a payment fails.

This means, if the payment form was submitted, and a request to process the payment was sent to the API, but the transaction failed, the onFailure function will be initiated.

Example: A payment request was submitted to the API, but the bank declined the charge, triggering the onFailure function.

For example,

onValidationFailure

This callback function will execute only if PayFields returns an error, and cannot send a payment request to the API.

Example: A customer attempts to submit a payment, but leaves the number field blank, triggering the onValidationFailure function.

onFinish

This callback function will execute whenever the API has completed a payment submission, whether the payment was successful or not.

Google Pay - Card Not Present and Card Present Compatibility Information

Card Not Present (CNP)

Google Pay is available in an e-commerce environment as an additional payment option in the checkout flow. Google Pay is easily integrated into the current payment solutions to provide a fast and easy way to use the product. You can take advantage of Google Pay in the PayFrame and PayField solution using the previously mentioned steps by adding the JavaScript code snippets to your current solution.

Card Present (CP)

Google Pay is an innovative way to remove friction from the retail checkout process, creating a fast, secure way for your customers to make payments in-store. It improves security by utilizing biometric cardholder authentication and removing the need to input card data.


Terminal Compatibility

Google Pay is available in all Terminals with NFC support and will be processed as a contactless payment.

Google Pay - Setup Example Videos

PayFrame

PayFields

Google Pay - PayFrame Example Screenshot

JavaScript errors detected

Please note, these errors can depend on your browser setup.

If this problem persists, please contact our support.